Studio Guide
A living guide to Studio, the block designer built into TideStitch. For everything else in the app, see the User Manual.
A living guide to Studio, the block designer built into TideStitch, current as of version 1.9 (34). Sections grow as Studio does. For everything else in the app, see the main User Guide.
What Studio is
Every block in TideStitch's picker was drawn by somebody. Studio is where you become that somebody: a full block designer, built into the app, that lets you draft a block from scratch, watch its exact cut sizes work themselves out as you draw, and then use that block in real quilts alongside every built-in.
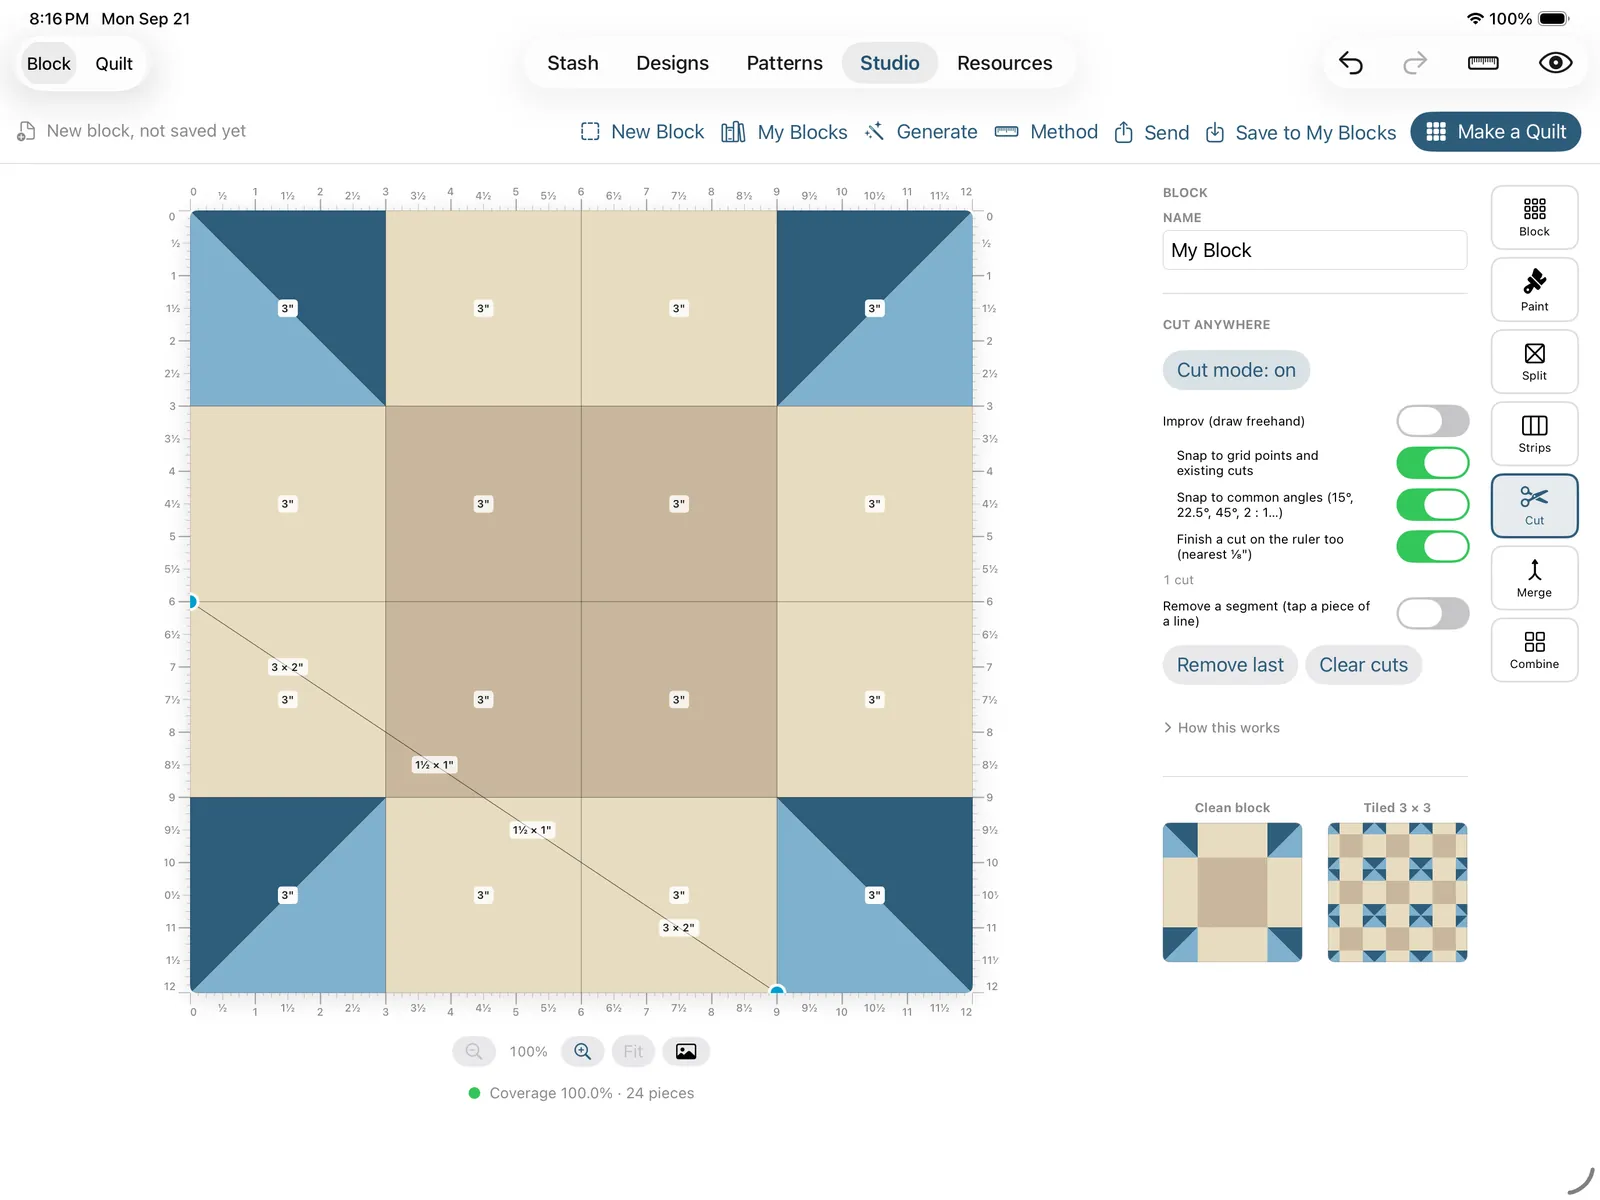
Blocks you make in Studio are not a walled garden. They show up in the block picker like any other, sync to your other devices (your phone included), and can be sent to another quilter. Studio is the authoring tool; the blocks it makes are first-class citizens everywhere else in the app.
Studio is deliberately its own thing, sold separately, because it is a whole extra tool rather than a corner of the core app. Desktop quilt-design software runs into the hundreds of dollars; Studio is a one-time purchase and it lives on the iPad and the Mac you already own.
The unlock
Studio is a separate one-time purchase, on top of the base app. Not a subscription, not a rental: buy it once and it is yours, on every device signed into the same Apple ID. Because it is a Universal Purchase, a block you draw on the iPad is on the Mac (and the phone) as soon as they sync.
A few things worth knowing before you buy:
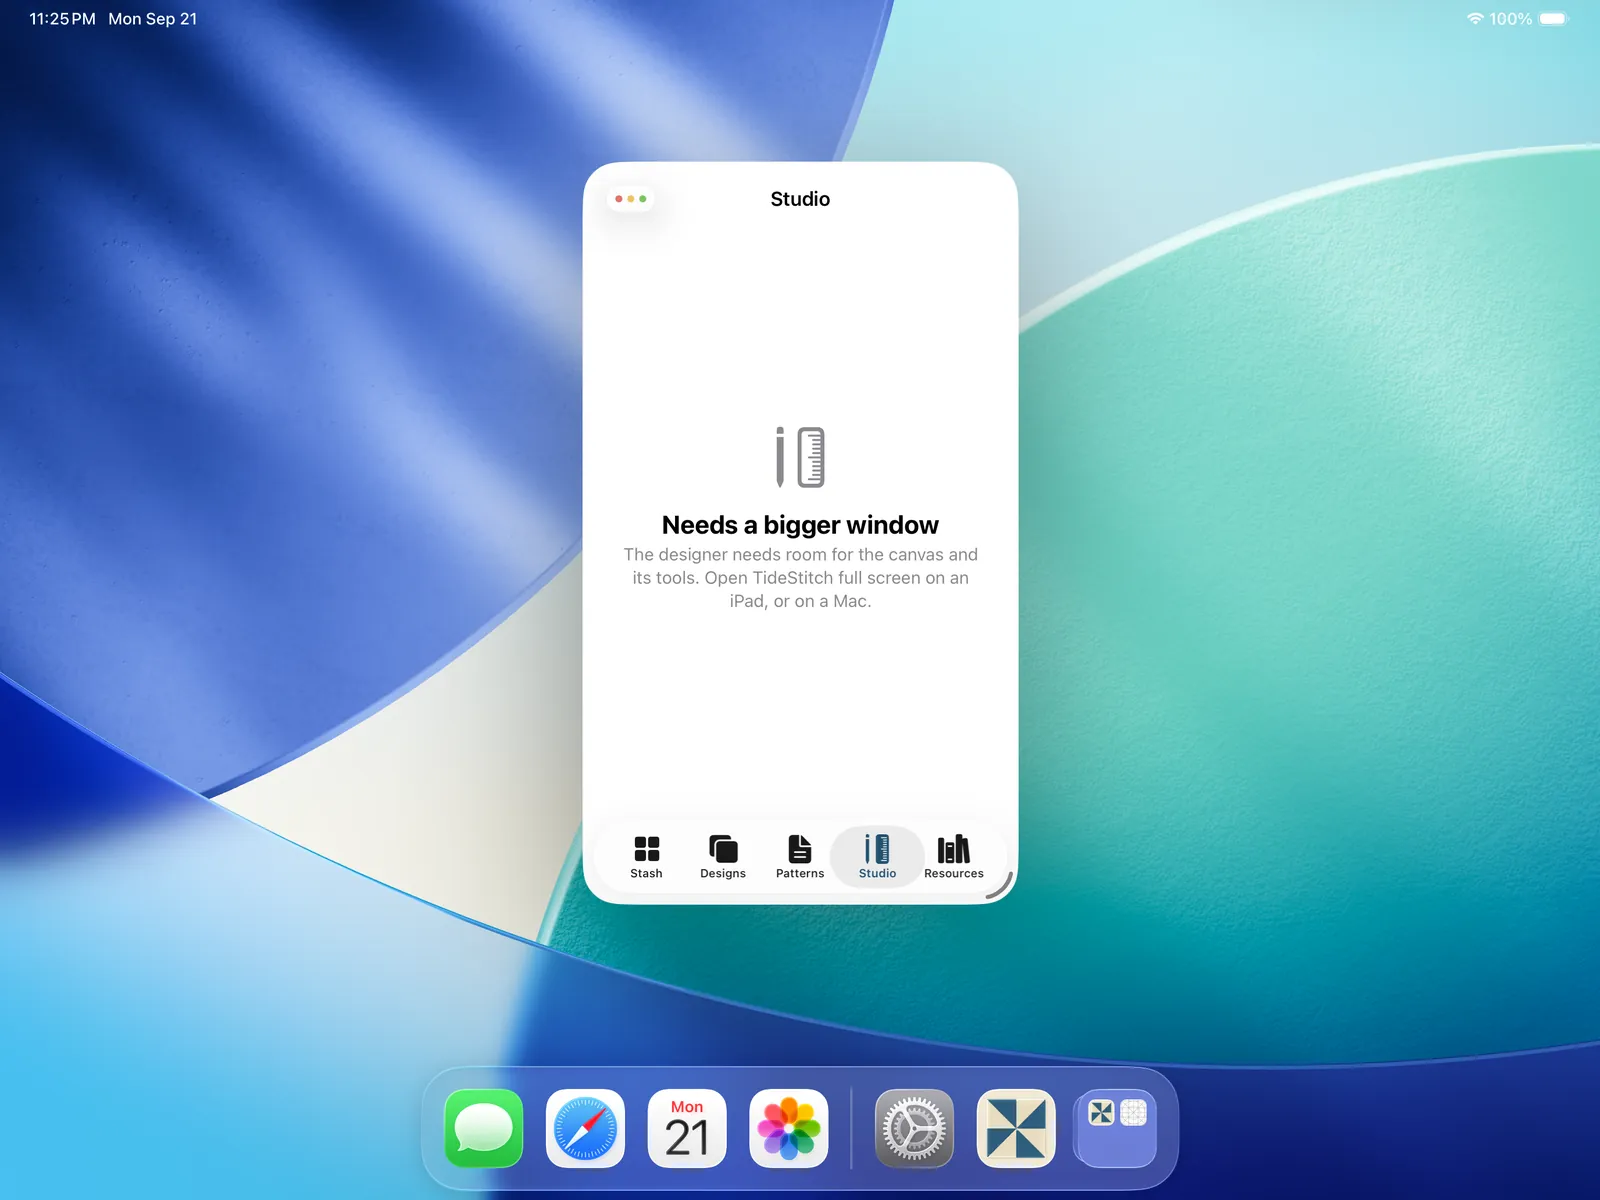
- It runs on iPad and Mac only. The canvas and its seven tools need room. A phone can't give them that, and neither can an iPad in Slide Over, so the designer only opens where there's space to work. Your phone still carries the blocks you draw; it just isn't where you draw them. On an iPhone there is no Studio tab at all: the Resources tab carries a short About Studio card instead (here's what it is, get it on an iPad or a Mac), rather than a tab that would lead nowhere.
- You can buy it two ways, and you're only ever shown the one that fits. If you already own the app (Basic), Studio is offered as an add-on on top of it. If you own nothing yet and you're on an iPad or a Mac, you're offered Basic and Complete side by side: Complete is the app and Studio together in one purchase, for less than the two bought separately. Complete is never sold on a phone, since a phone can't run half of it, and never to someone who already owns Basic, so nobody pays for the app twice. The in-app screen shows the live price for your region.
- Studio was never part of the free launch. The app was free for everyone who arrived early, and stays that way for them, but Studio is a real paid tool from day one. Because it always comes on top of the app (as an add-on, or inside Complete), by the time you own Studio you have unlimited designs too, so Make a Quilt is just an ordinary new design.
If Studio ever says it's locked on a device you know you paid on, use Restore purchases on the unlock screen, or Resources → Settings → Purchases → Restore Purchases (which is there precisely for the device that never shows you an unlock screen), and make sure you're signed into the right Apple ID. That covers a reinstall or a brand-new device. You don't have to hit the Studio tab to see the price, either: Resources → Purchases at the bottom of the tab, and the same rows under Settings → Purchases, open the Studio offer on purpose (Unlock Studio, iPad and Mac only) and go away once it's yours. A code from us goes in through Redeem an App Store Code beside Restore.
Where Studio lives, and opening it
On iPad and Mac the Studio tab is always there, between Patterns and Resources: a row across the top on iPad, an item in the sidebar on Mac, with a pencil-and-ruler icon. Tap it before you've bought Studio and it tells you what Studio is and offers the unlock (see The unlock); tap it once you own it and you're in the designer. On a phone the tab doesn't exist, and Resources carries the About Studio card in its place.
Open it full screen and you get the canvas and every tool. Open it too narrow (an iPad sharing the screen with another app, say) and it tells you so plainly rather than cramming the tools into a space they don't fit: "Needs a bigger window." Give it the full screen and it's back.
The workspace
The designer arranges itself around the shape of its window, not the name of your device. When the window is wider than it is tall, the tools sit in a rail beside the canvas with a control panel next to them. When it's taller than wide (a portrait iPad), the canvas takes the top and the tools drop to a shelf along the bottom. Same tools either way; they just move to stay out of the drawing's way.
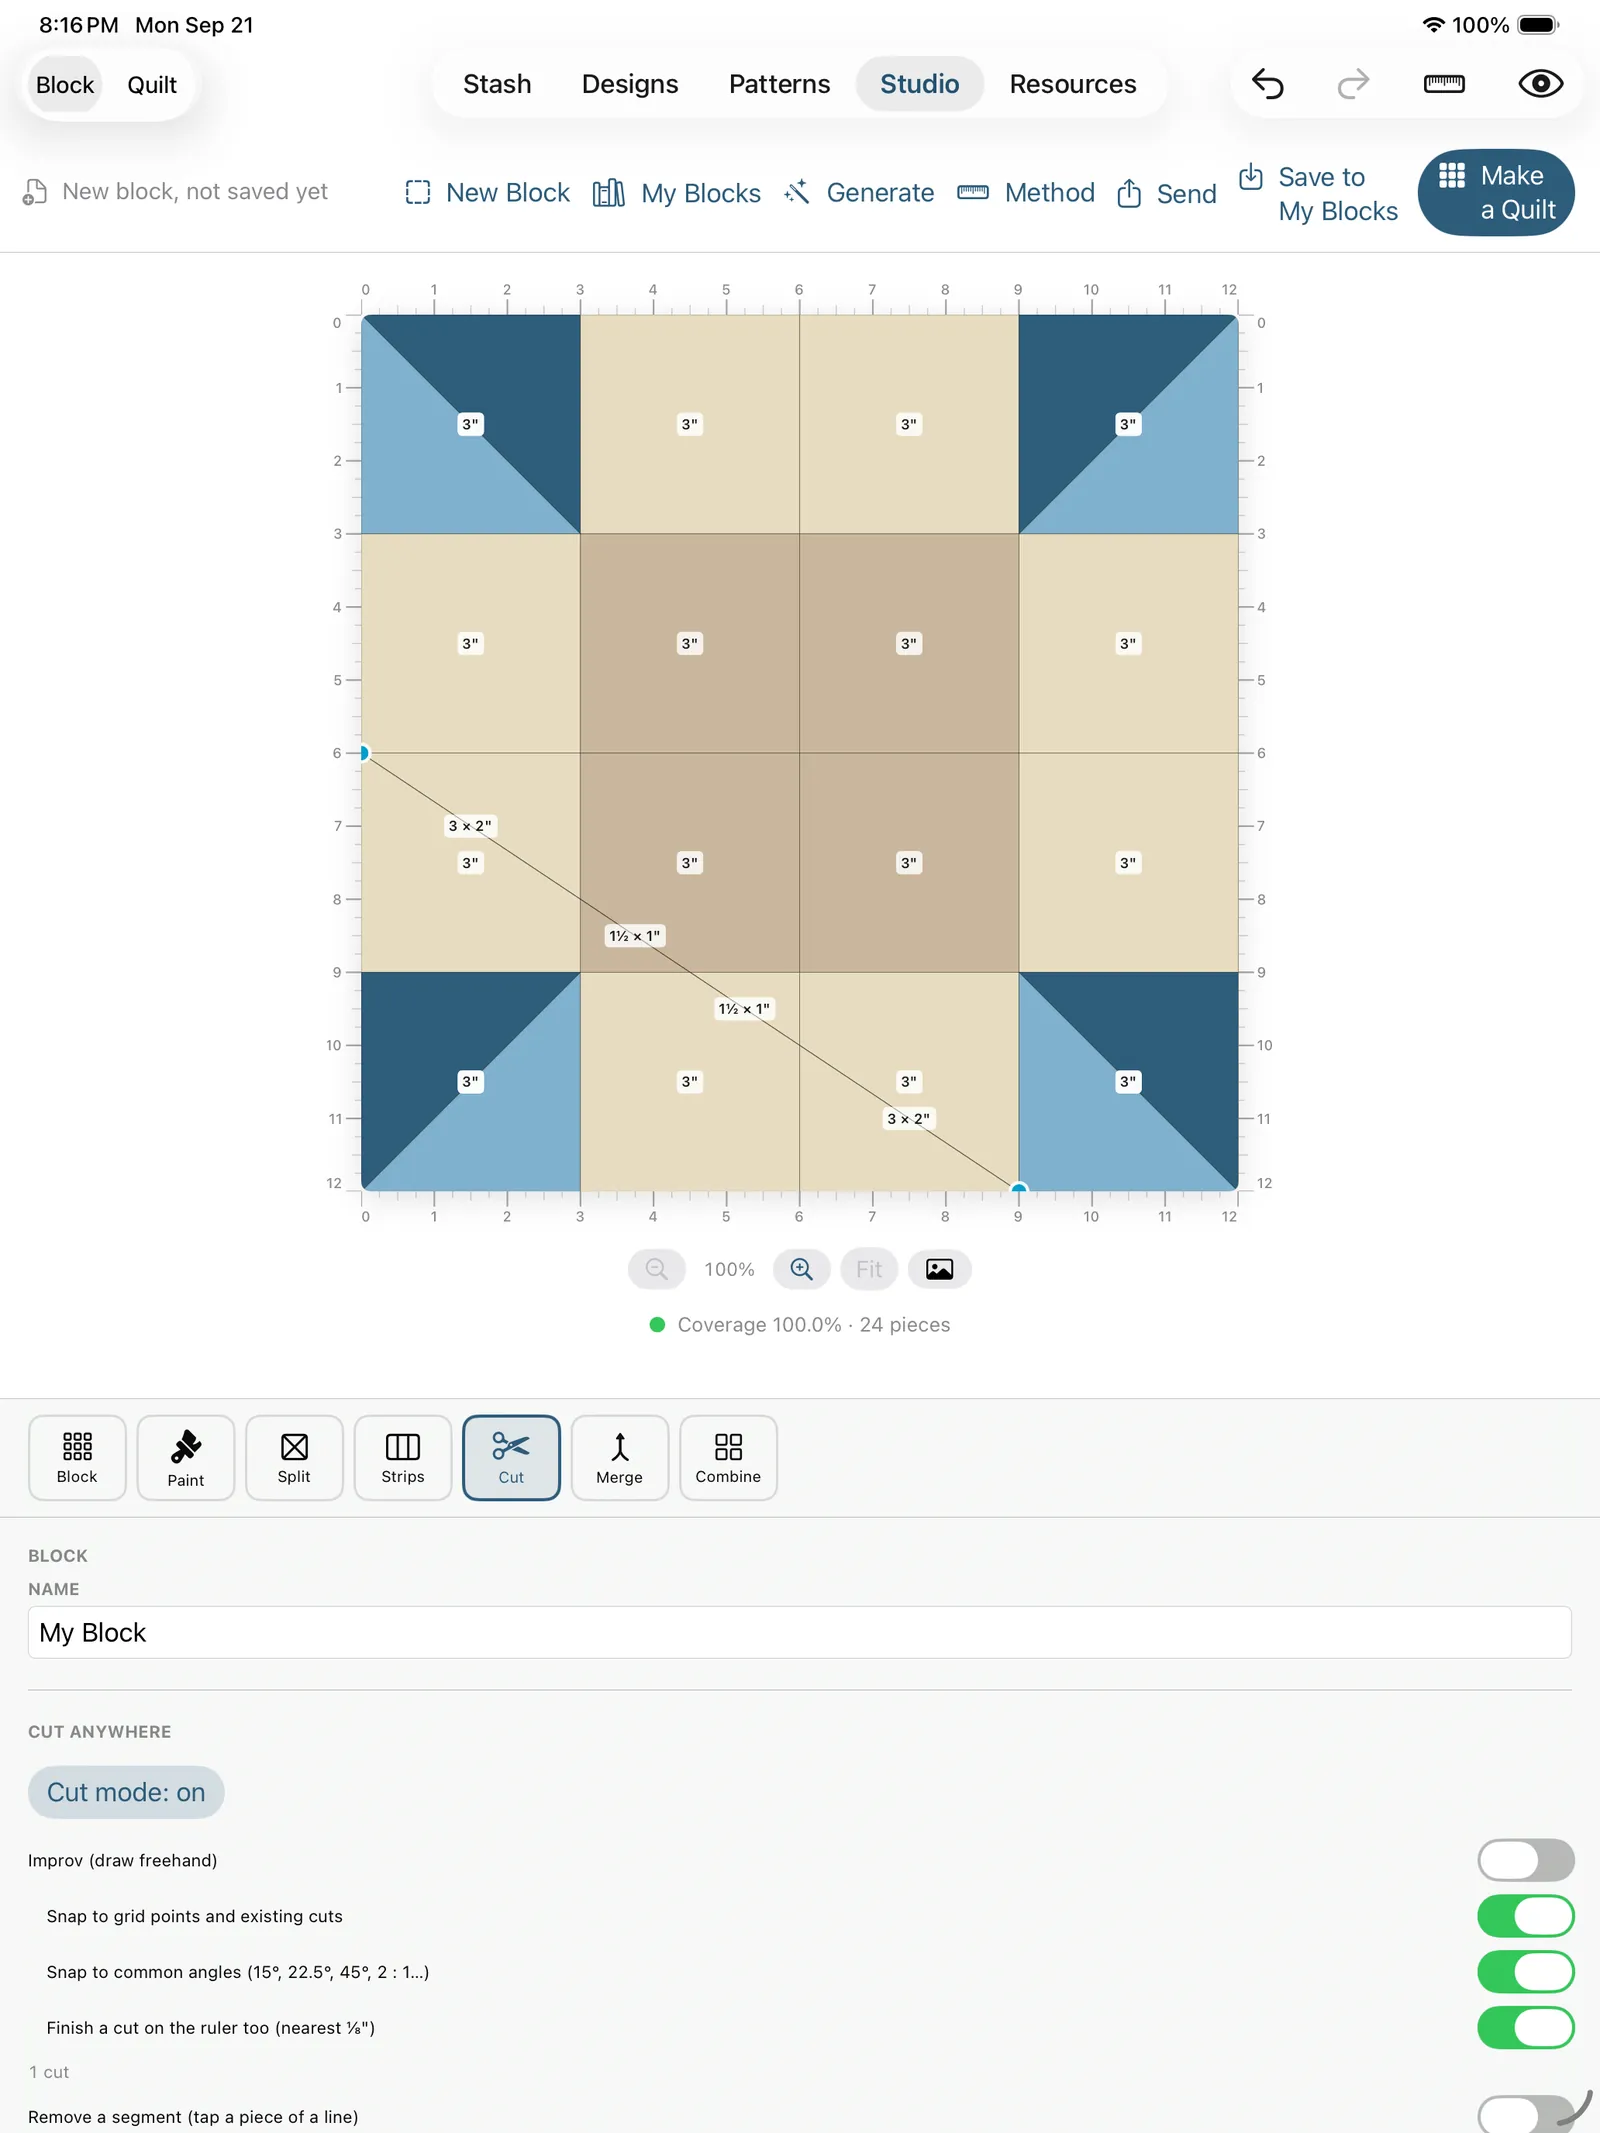
Across the top of the designer:
- A Block / Quilt mode picker (see below).
- Undo and Redo (the curved arrows; ⌘Z and ⌘⇧Z on a keyboard).
- Size & grid, a menu with columns, rows, and finished size (the same settings as the Block tool, put where your hand already is).
- View, a menu of overlays: Rulers down the edges, Piece sizes written on each piece, Cut handles (the little dots you grab to move a cut), and on a paper-pieced block Sew order, each piece's foundation sew number (see Foundation paper piecing).
Above the canvas is a host bar of block-level actions: New Block, My Blocks, Generate, Method, Send, Save, and the prominent Make a Quilt. Each of those has its own section below. (The reference photo used to have a menu here too; it lives in the zoom row now, see Tracing from a photo.)
New Block clears the canvas to start fresh. It keeps your current size and grid (you're probably drawing another block the same size), and if there's unsaved drawing on the board it asks first. There is no gallery of starter shapes to pick from: a new block is an empty grid, and what it becomes is entirely what you do to it.
Block mode and Quilt mode
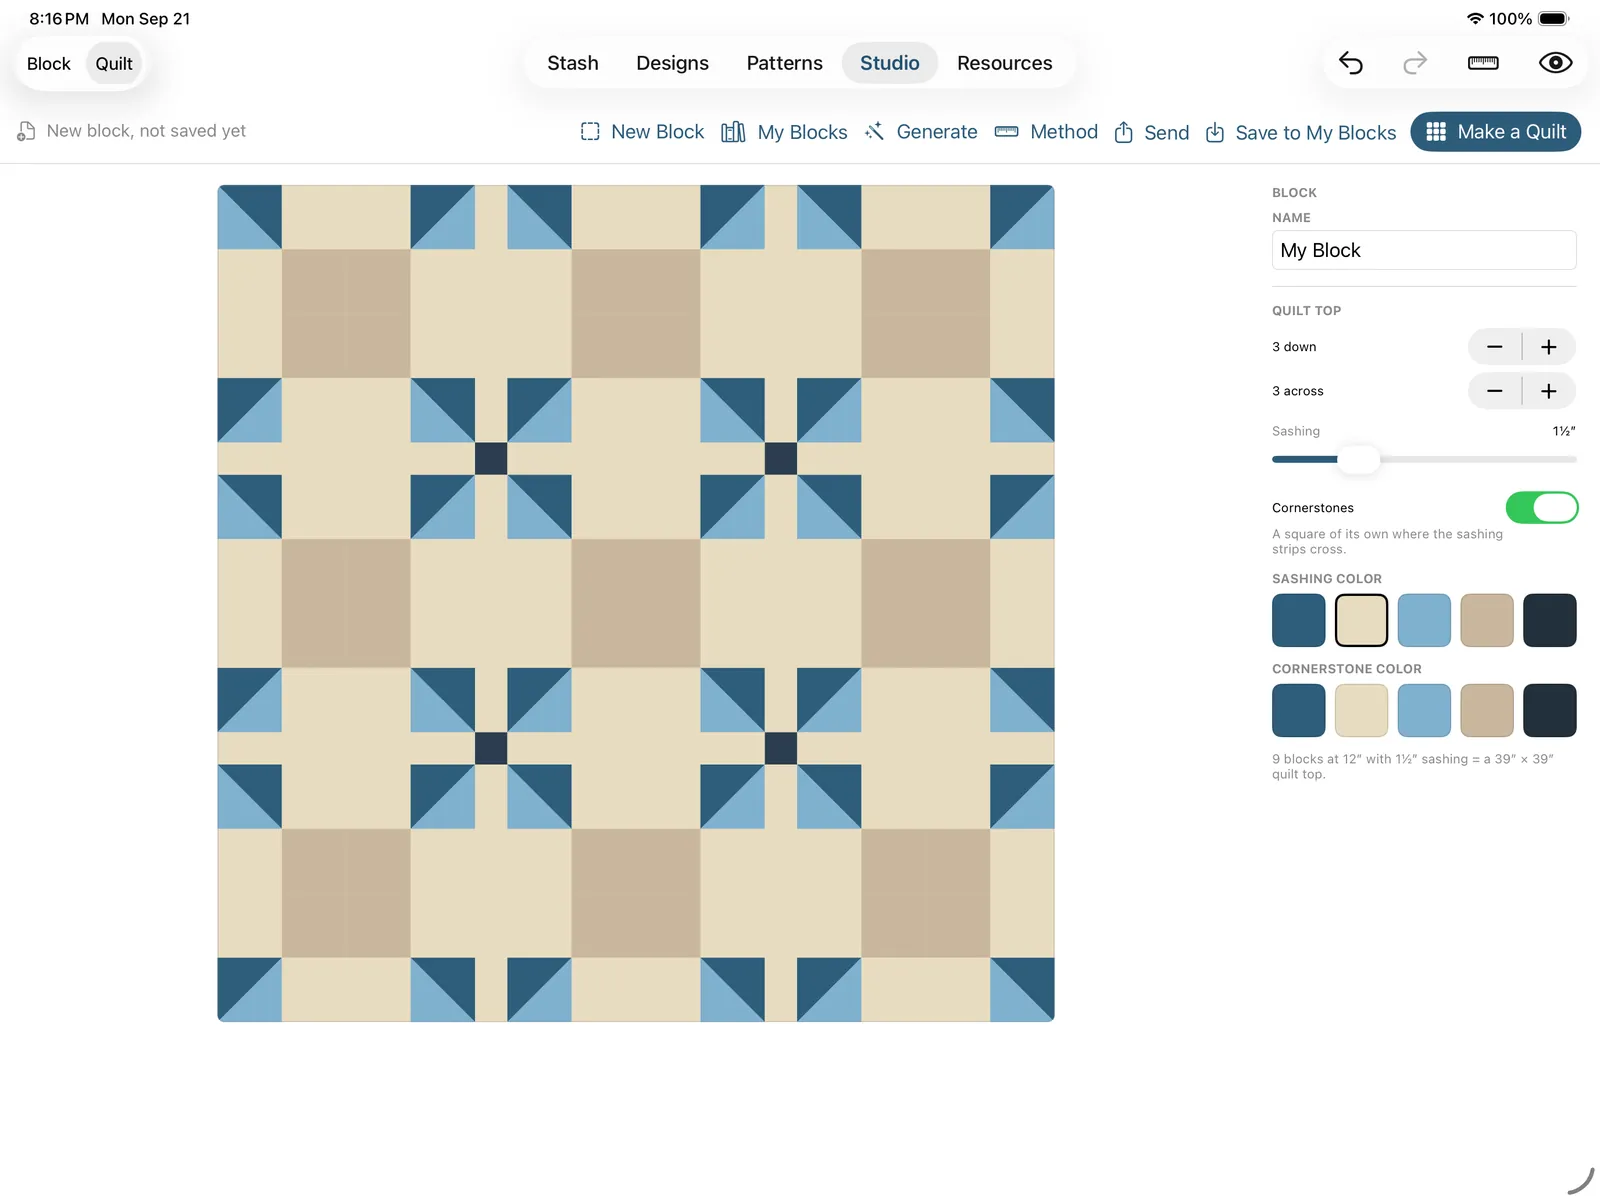
The Block / Quilt picker at the top switches what you're looking at:
- Block is where you draw. The tool rail is here, and everything in The tools works in this mode.
- Quilt previews your block laid up into a top: rows and columns of it, with optional sashing and cornerstones, so you can see the repeat as a real quilt before you commit. The tool rail hides here, because there's nothing to draw; you're setting how the block tiles. Whatever you set in Quilt mode is what Make a Quilt builds for real.
The grid is not the pieces
This is the one idea that makes the rest of Studio click. A block is drawn on a grid of cells, and the grid is scaffolding, not the pieces you cut. A 4 × 4 grid is just how many cells you're drafting on. What the block is actually made of depends on what you do to those cells:
- Leave a cell whole and it's a square.
- Split it corner to corner and it's two triangles.
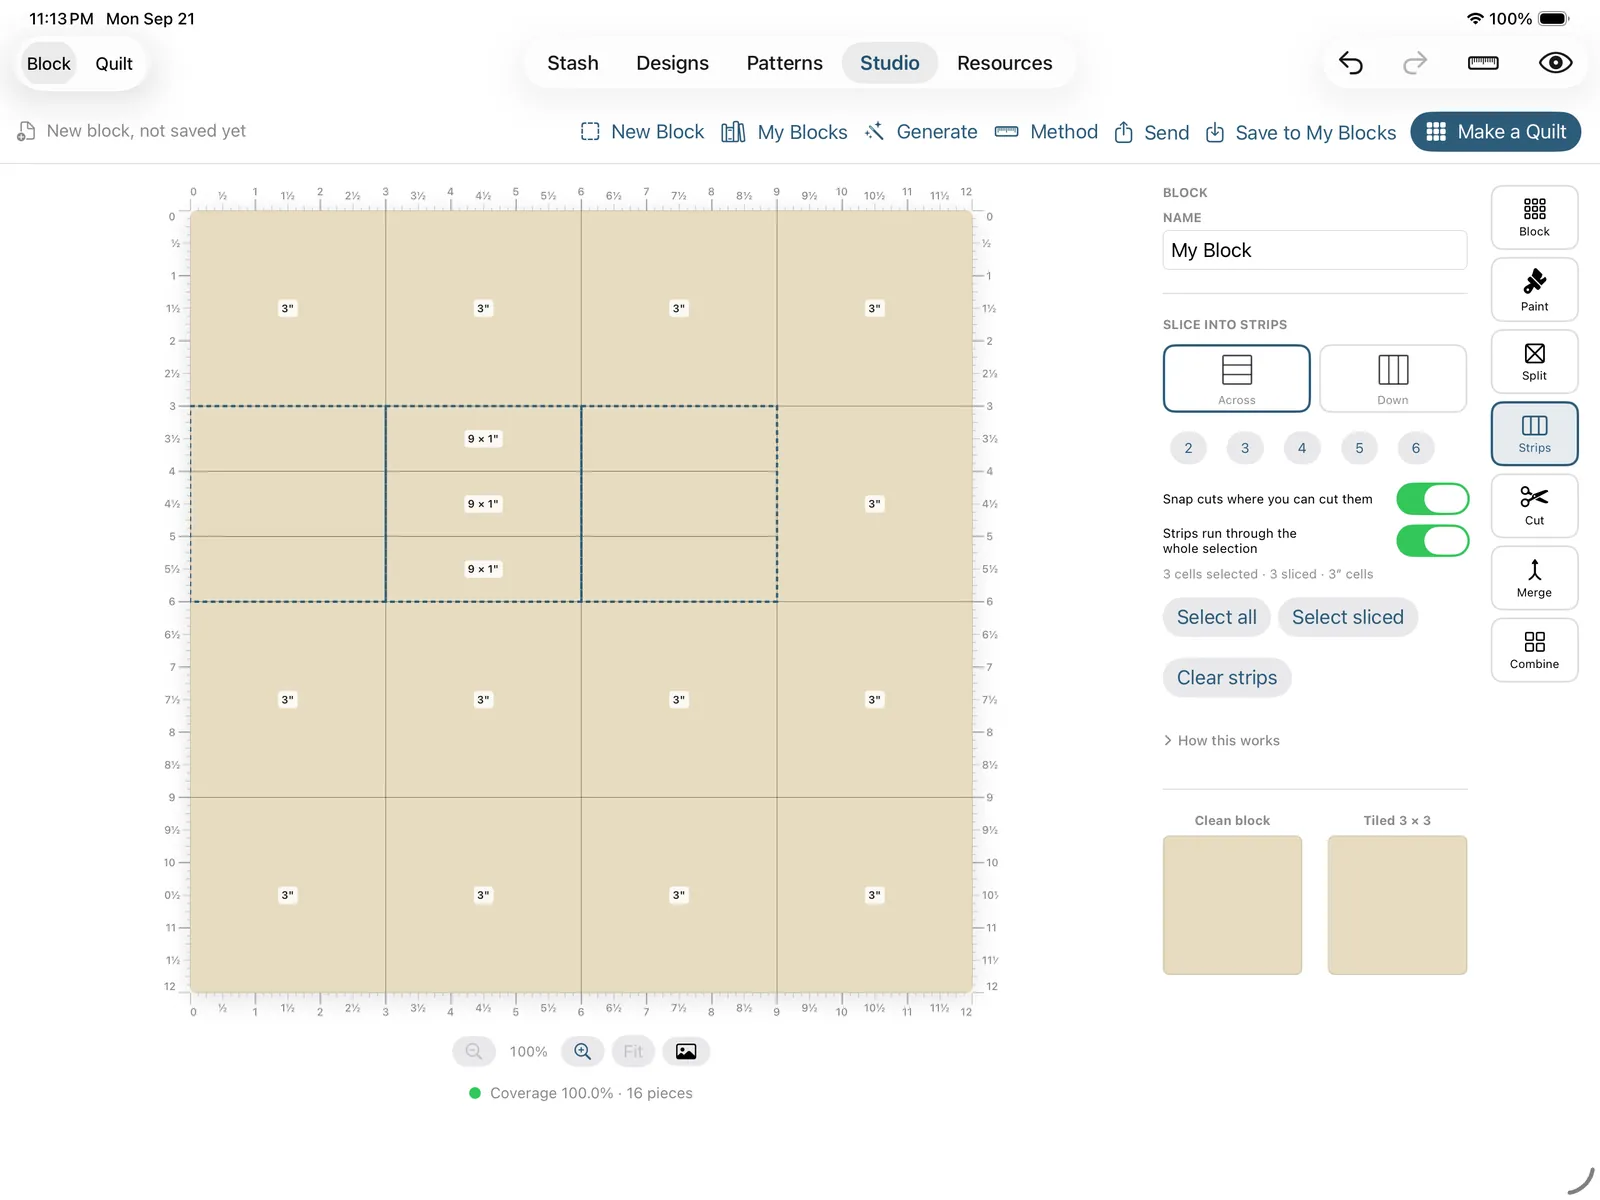
- Slice a run of cells into strips and you get long pieces that cross the whole run as one piece, not one square per cell with a seam at every line.
Everything is measured live. As you draw, Studio keeps the true finished size of every piece, so a block you draft at 12″ tells you the real cut dimensions of each triangle and strip the moment you make it, before seam allowance. The grid is how you think; the pieces are what you cut.
And the cut list knows the shapes a rotary cutter actually makes. A square, a rectangle, a half-square triangle, a quarter-square triangle and a 45° diamond are each named and cut the way a quilter cuts them: the diamond as a strip subcut on the ruler's 45° line, the way a Lone Star is cut, and the quarter-square from a square cut on both diagonals. A shape none of those describe is billed honestly as the rectangle to cut it from, trimmed to the printed outline, rather than dressed up as a unit it isn't.
The tools
Down the side of the canvas (or along the bottom shelf) is a rail of seven tools. Pick one, then work on the canvas. They're ordered the way a block gets built: set it up, paint it, then cut it however you like.
Block: size and grid
The Block tool (square.grid.3x3) is the first decision anyone actually makes, so it's where the rail opens.
- Grid, the columns and rows you're drafting on, 1 to 16 each. Changing it re-measures every cell, and it's undoable like anything else. Set it to 1 × 1 for a single blank cell and draw the whole block freehand with the cut tools, rather than starting from a grid at all.
- Size, how big the block finishes in the quilt (before seam allowances). The list has the usual suspects, but the field takes any size you type: that's how a 34″ Bear Paw gets drafted. The value is clamped to something sane and read back to you after you tap Set.
- Rectangular opens a separate Height field for blocks that aren't square. The canvas draws at the block's true shape, so a 12″ × 6″ block is a wide board, not a square you have to picture stretched, and the piece sizes are measured per axis, so a third of a 12″ × 6″ block is 4″ tall, not 4″ wide and 4″ tall. Downstream it stays honest too: the Layout sheet and New Design read a rectangular block as 16″ × 17″, never as a 16″ square, and multiply the quilt out from both sides.
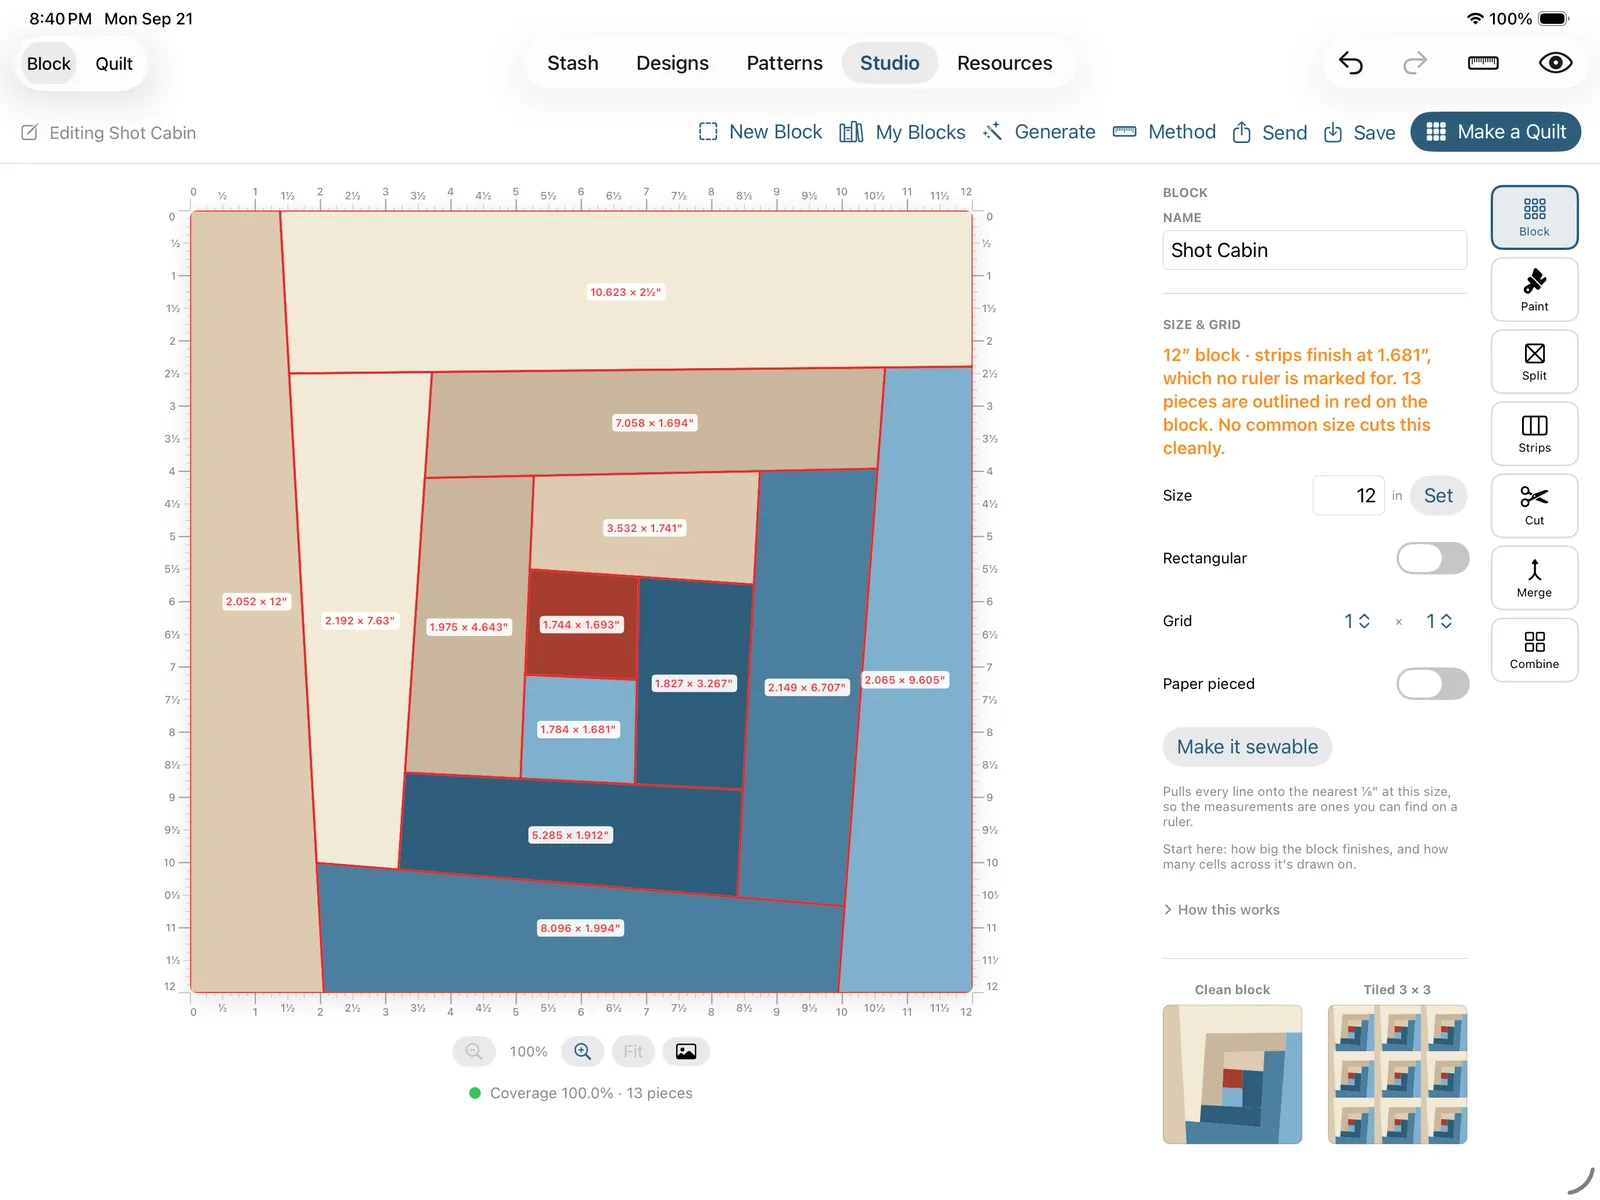
- Make it sewable appears when it can help: it nudges every line you've drawn onto the nearest ⅛″ at the current size, so your pieces come out as measurements a ruler actually has, not 1.11″ oddities.
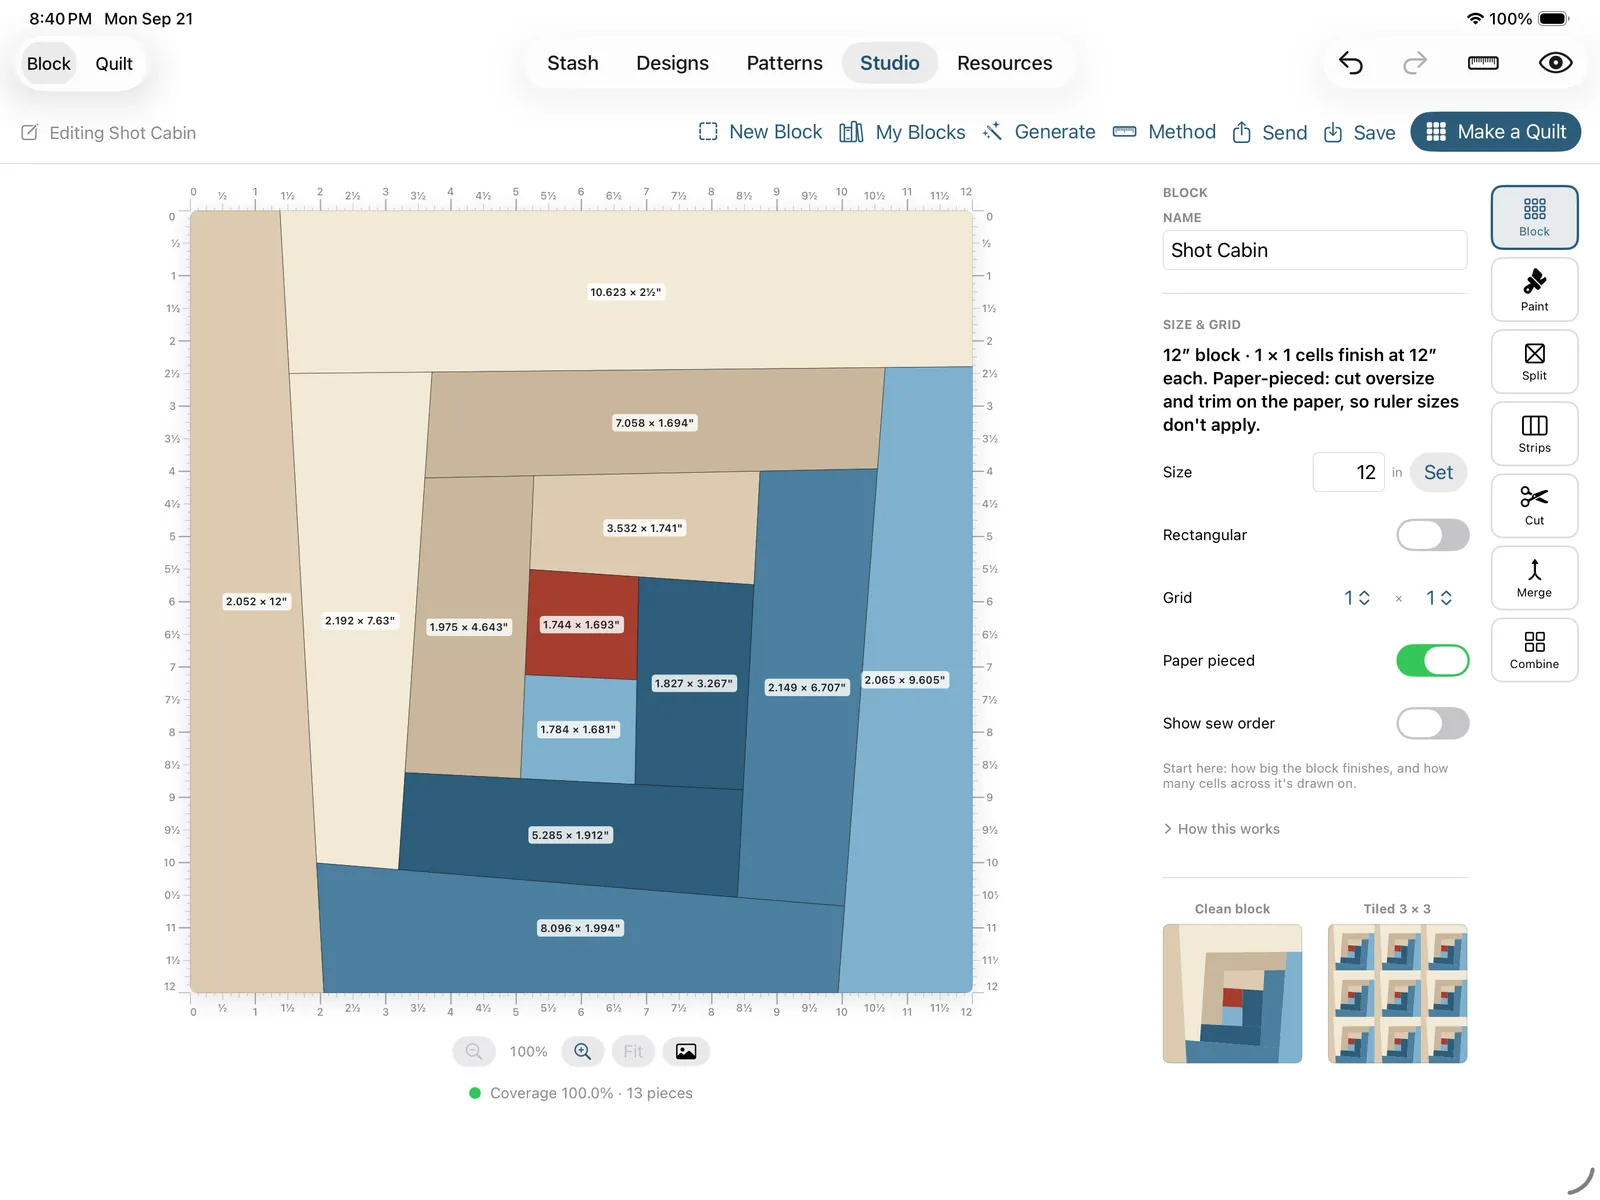
- Paper pieced is a switch in this same panel, sitting next to the size warnings it turns off (red outlines on the canvas, an orange headline in the panel). A block sewn onto a printed foundation doesn't care whether its pieces land on a ruler mark, so flipping this on marks the block as foundation paper pieced (the same setting as the Method menu) and silences the red. A Show sew order switch appears beside it once it's on. See Foundation paper piecing.
Paint
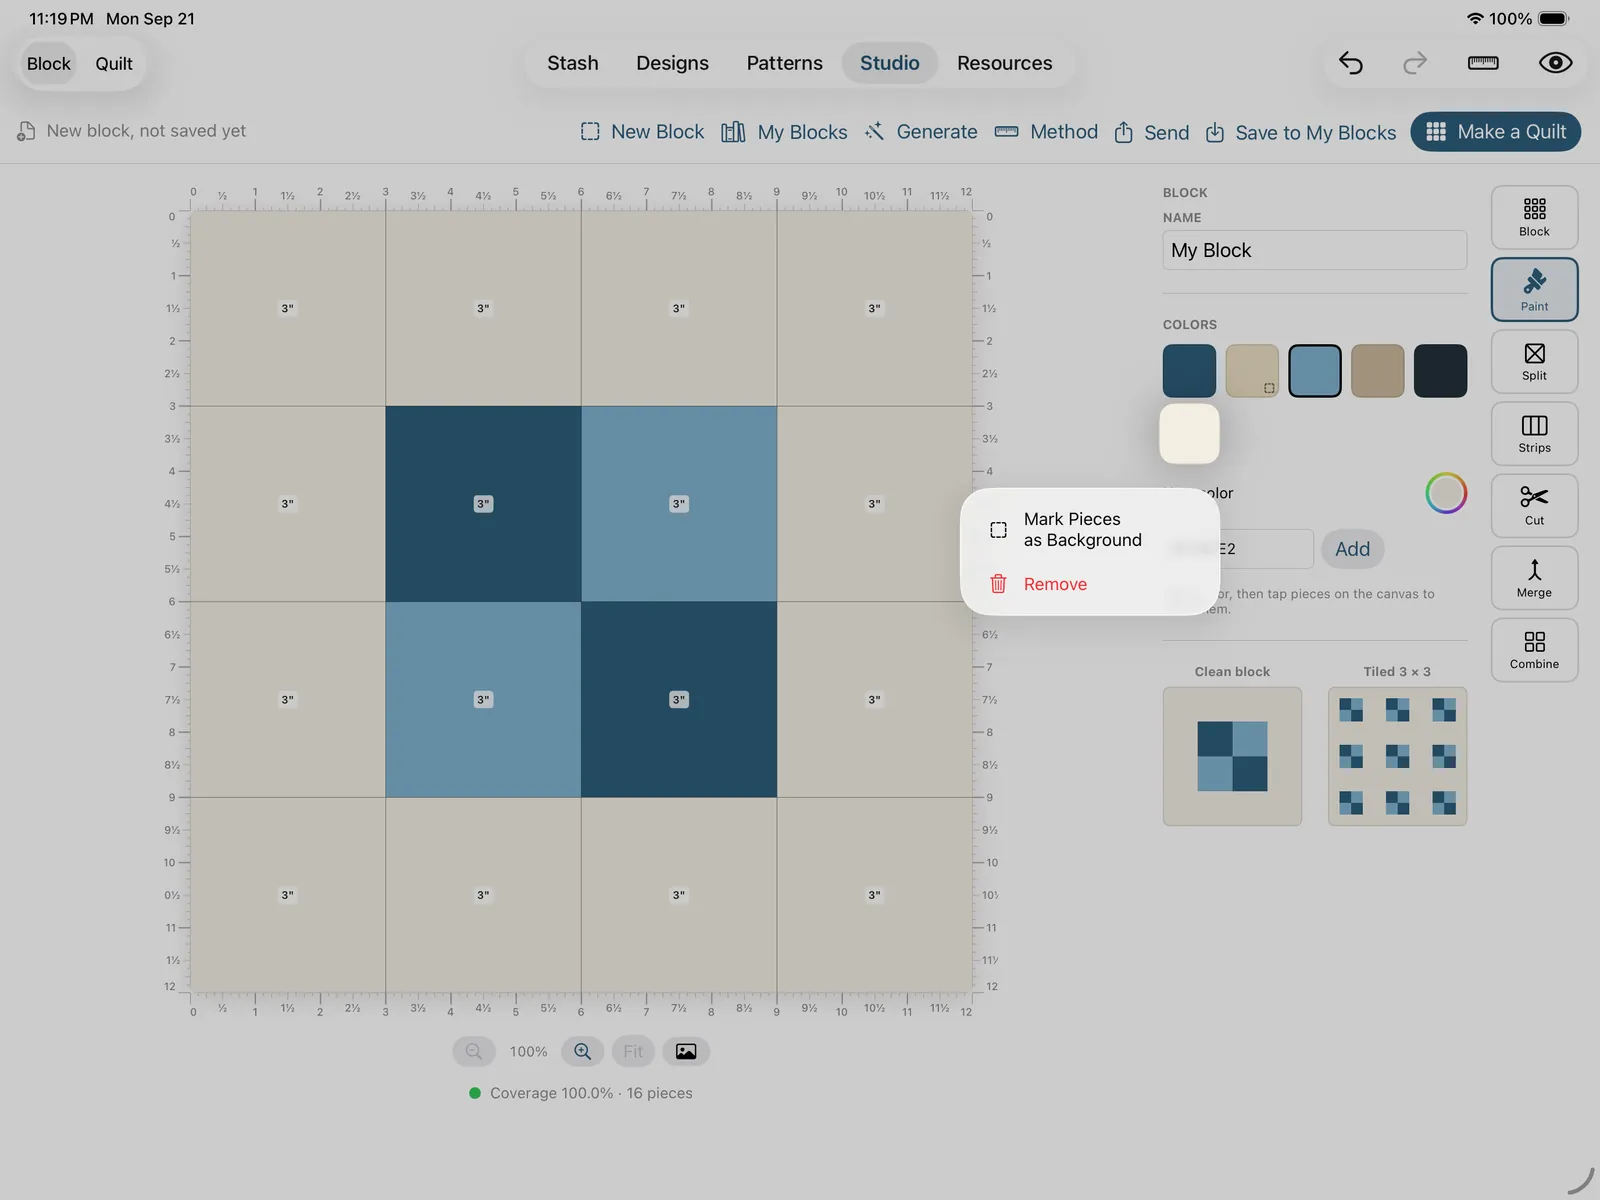
Tap a color in the palette, then tap pieces on the canvas to color them. This is how the block looks; it isn't tied to real fabric yet. That happens later, when the block is in a quilt and you paint your actual stash into it in the design editor.
Add a color with the picker: the system color wheel, or a #RRGGBB hex field and Add. Long-press (or right-click) a swatch to remove it. The block opens with a sensible default palette so you're never staring at an empty tray.
One color in that palette means something. The cream swatch wearing a Background badge is the block's background color, and it's a convention the rest of the app reads: when your block is in a quilt, every piece painted that exact cream takes the design's Background fabric automatically, and the pattern treats those pieces as background. Paint your background pieces any other off-white and they're just off-white; the quilt's background fabric will never reach them, and nothing on screen would tell you why. So use the badged swatch for background, and if you already didn't, long-press the color you used instead and choose Mark Pieces as Background: every piece wearing it (cells, cut faces and merged shapes alike) is repainted cream in one undoable step, and the status line counts them. Save, and designs already using the block pick the fix up.
Split
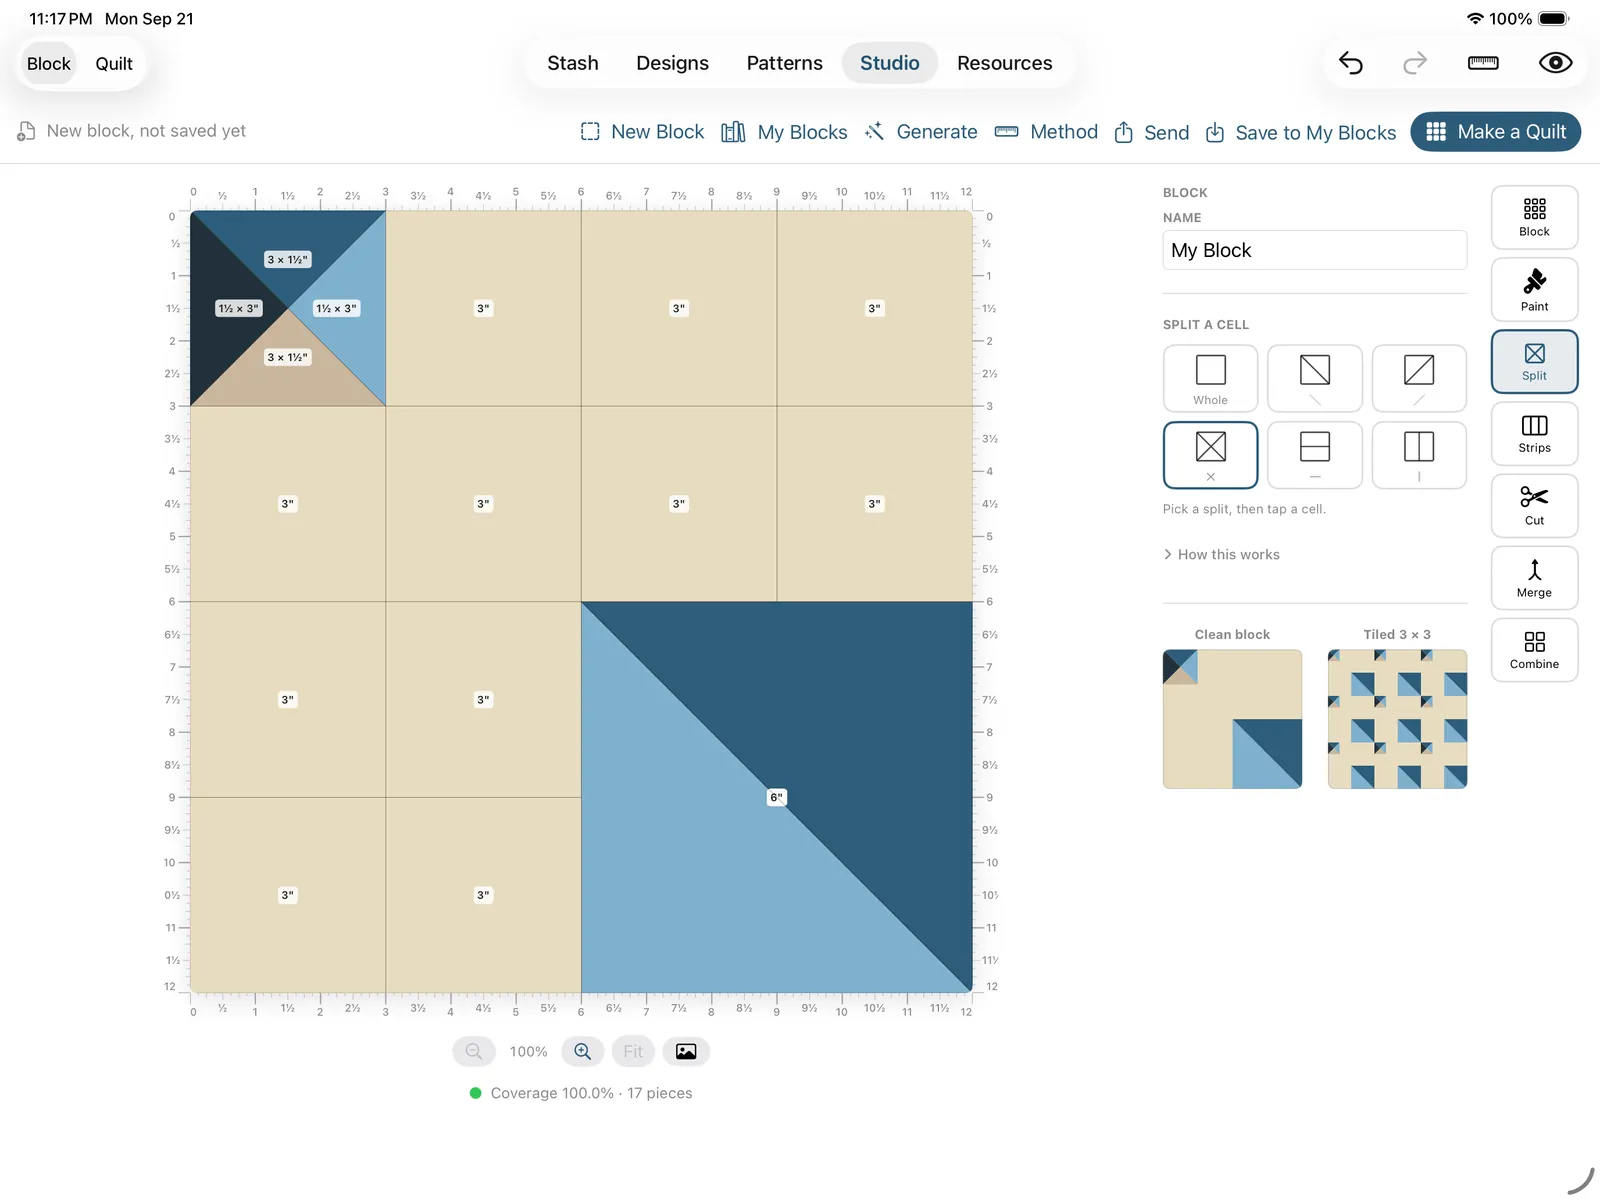
Pick a split shape (whole, ╲, ╱, an ✕, a horizontal, or a vertical), then tap a cell. Split works on merged shapes too: ╲ on a merged 2 × 2 gives you one big triangle pair at full size, each half painting on its own.
Strips
Slice cells into strips that run as single pieces. Pick an axis (horizontal or vertical), then tap a cell to drop a cut, drag across several cells to slice a whole run at once, or use the even-division buttons (2 through 6) to split evenly. Two toggles shape the behavior: snap cuts where you can cut them (keeps pieces on real measurements) and strips run through the whole selection (the point of the tool: one long piece cut once, instead of a seam at every cell boundary). Buttons let you select all, select just the sliced cells, or clear the strips.
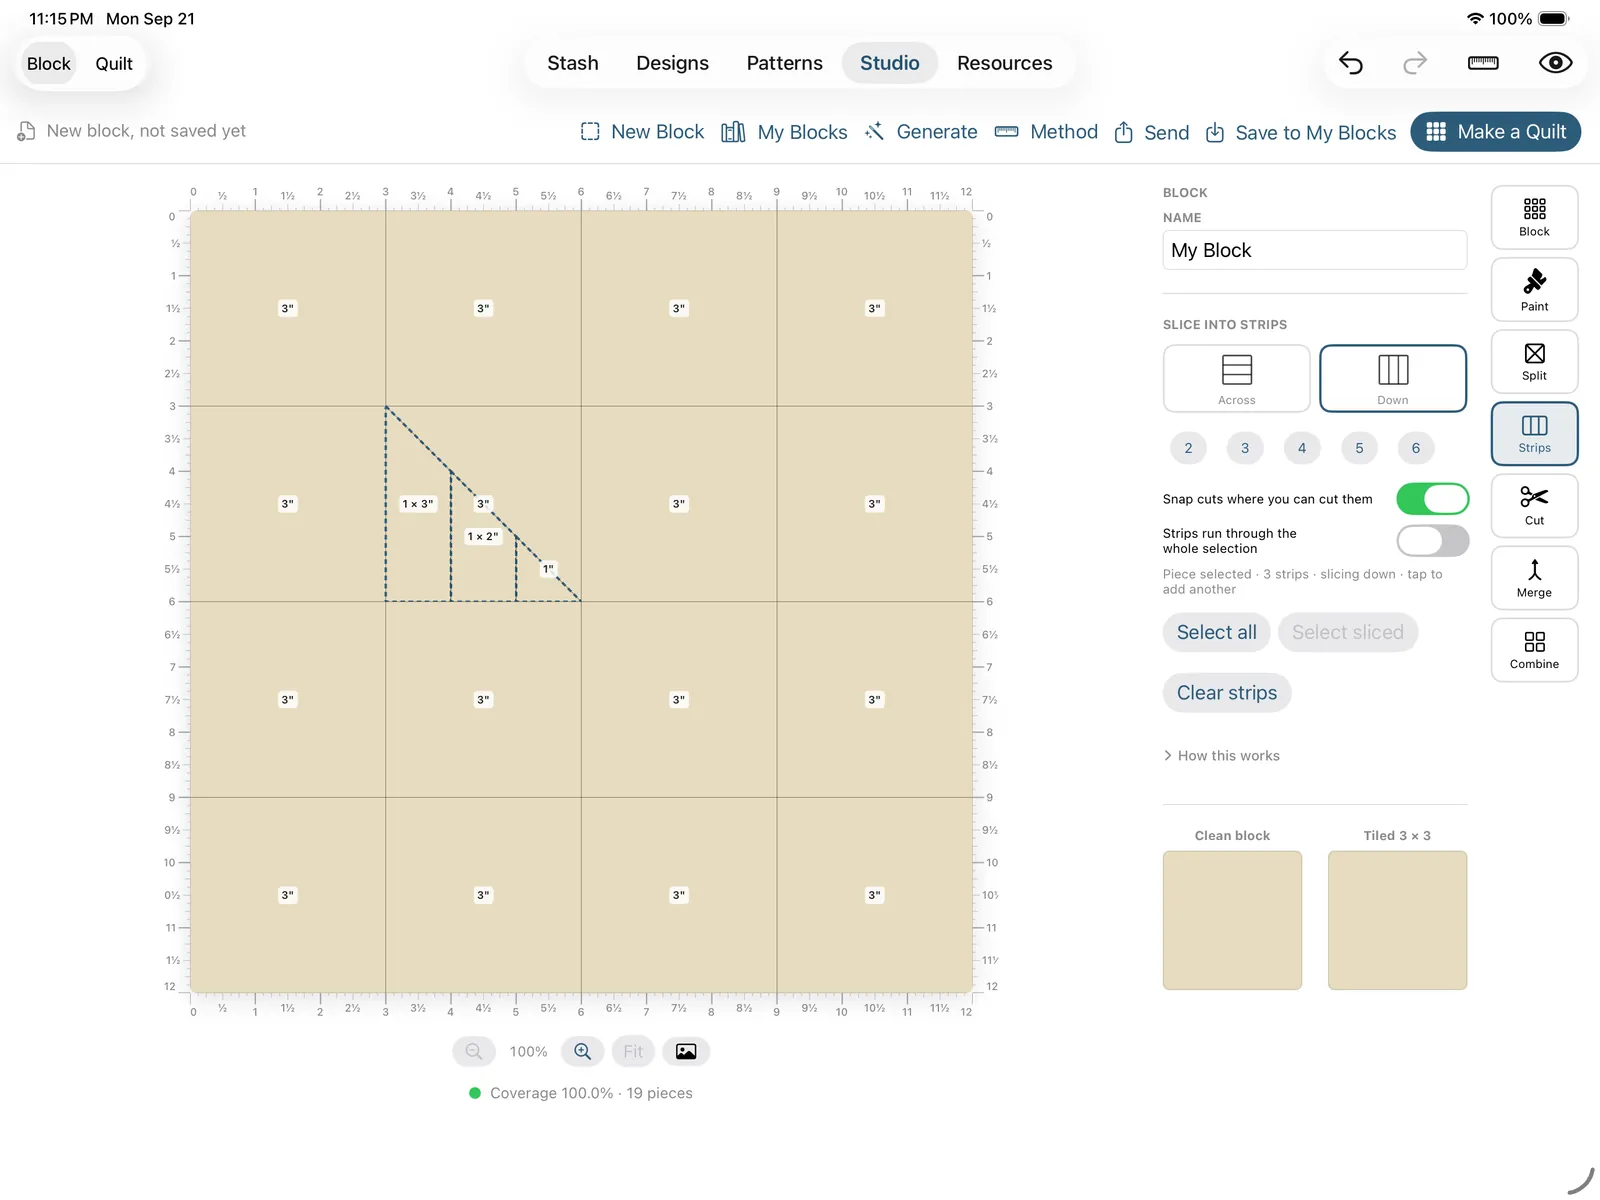
Strips also work inside a shape you've already split. Tap a triangle, an ✕ quarter, or any piece left by a cut, and that piece becomes the target: the strips are trimmed to its edges, so they run full width across the top of a triangle and get shorter toward its point instead of cutting straight across the whole cell. The even-division buttons divide the piece itself, and tapping inside it drops a single strip; tap a strip line again to lift it. The piece stays selected after the first slice, so you can keep adding strips to it, and a cut the other way crosses them all at once.
Cut
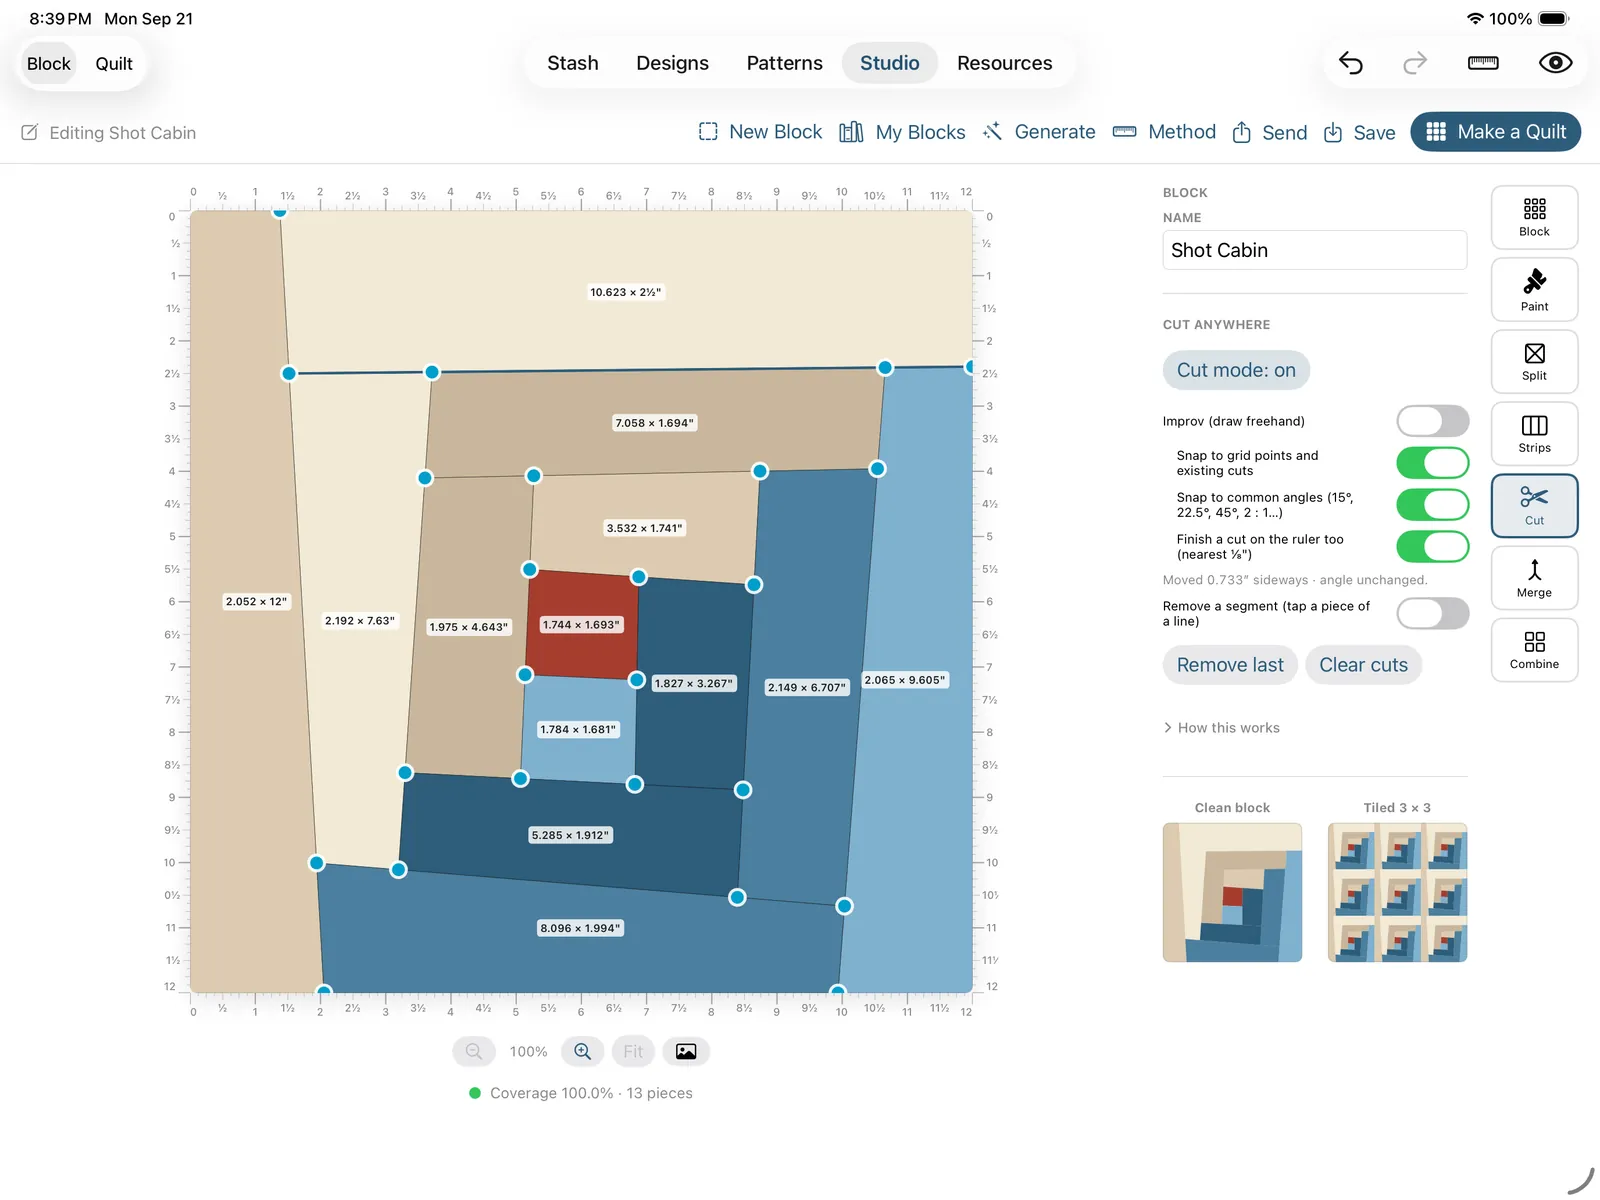
Draw a straight cut anywhere across the block, at any angle. Tap where it starts, then where it ends, or drag to draw it; the line follows the pointer with its angle shown, and it slices every piece it crosses. Options let you turn on Improv (draw freehand), and under that, snapping to grid points and existing cuts, snapping to common angles (15°, 22.5°, 45°, 2:1 and friends), and finishing a cut on the ruler at the nearest ⅛″ so you can draft by measurement rather than by eye. A remove-a-segment toggle lets you tap a piece of a line to take it out. Drag an endpoint dot to move one end; drag the middle of a line to slide the whole cut, keeping its angle. Sliding a cut re-measures the pieces it touches and nothing else: every piece keeps the color you gave it. (For a while a nudge on one seam of a log cabin could repaint a third of the block, because the paint was pinned to each piece's position in a list and moving a seam reordered the list. It's pinned to the piece itself now.)
Merge
Turn on Merge mode, pick up the little pieces of one bigger patch (tap them, or drag a box around them), then Merge selected so they cut as one piece. Tap a merged shape to break it apart again. This is the same idea as merging patches in the design editor, done here at draft time: the seams inside a merged piece vanish, because it's one piece of one fabric. (A Lone Star's diamonds merge in the editor, not here; see Stars.)
Combine
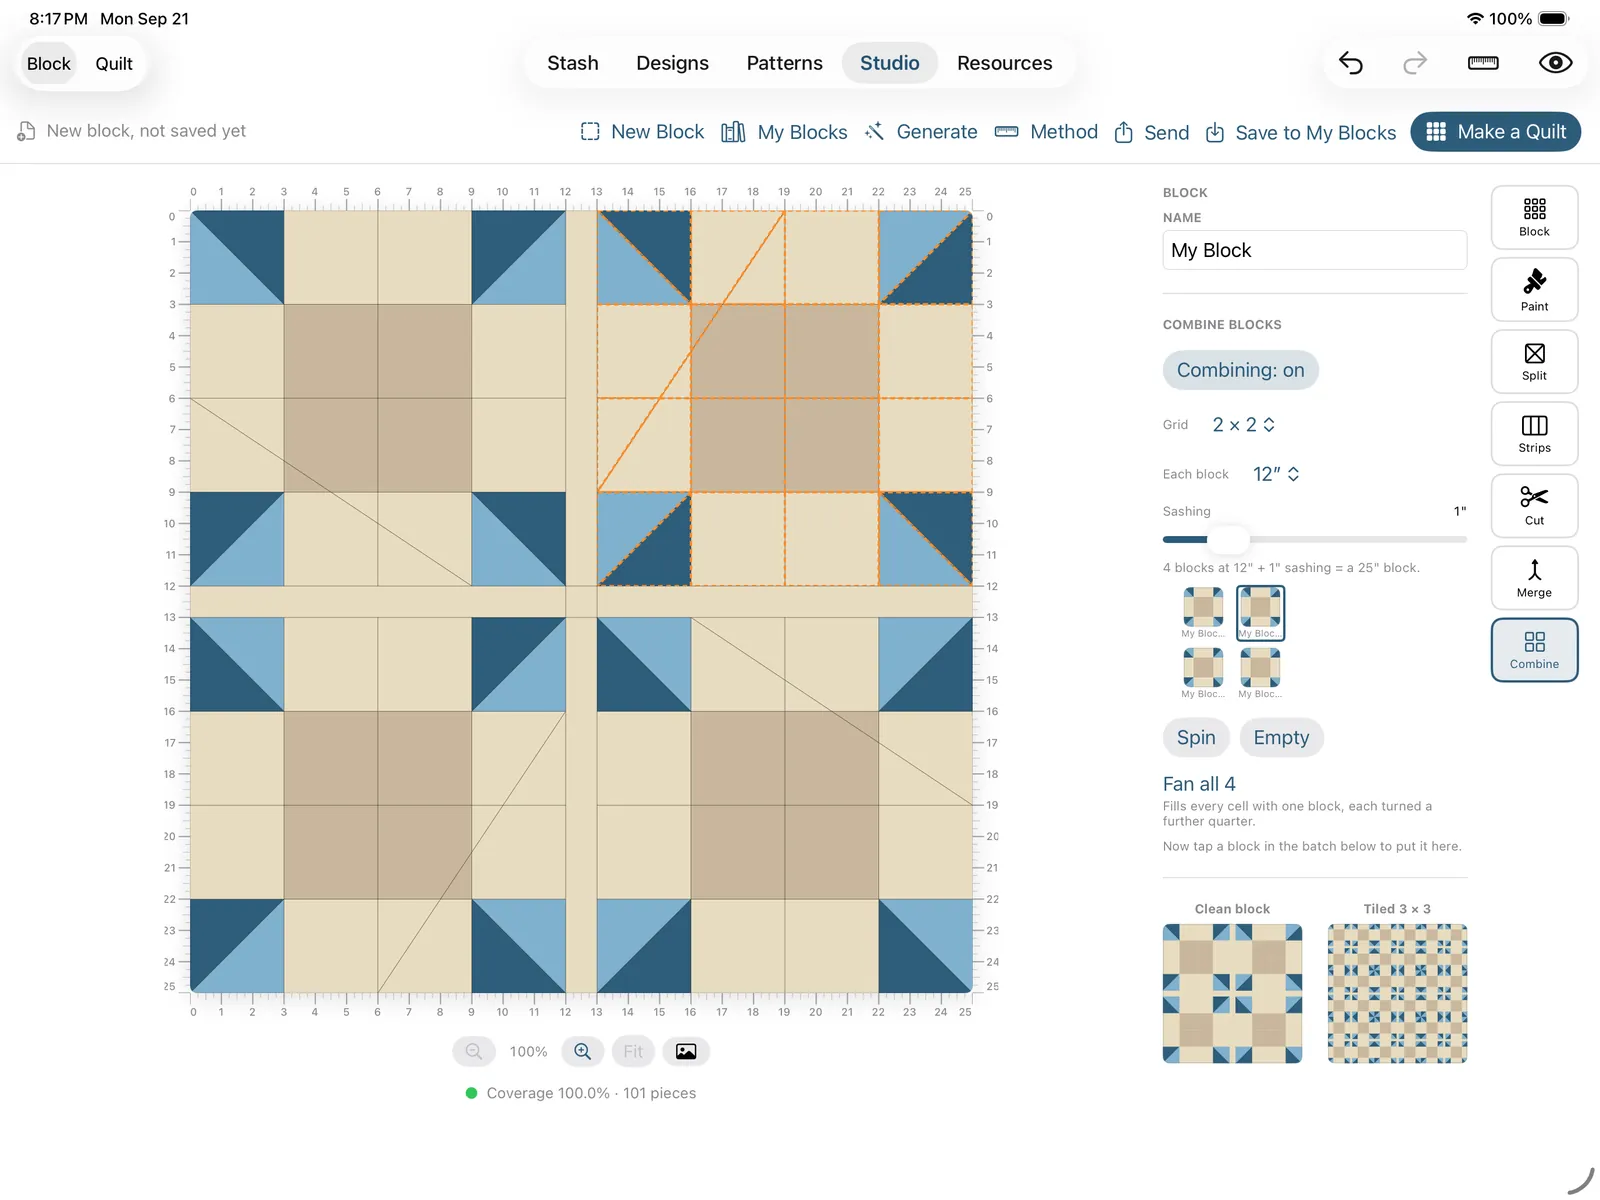
The one tool that builds a block out of other blocks. Combine blocks turns your block into a composite: by default four blocks fanned around the middle with sashing between them. From there you set the grid (how many blocks across and down), the size of each member block, and the sashing width in ¼″ steps. Tap a cell in the member grid to fill it with a saved block, use Spin to turn a member a quarter-turn, Empty to clear one, or Fan all to fill every cell with one block, each rotated a further quarter-turn. It's how a pinwheel-of-pinwheels or a medallion of your own blocks gets built without redrawing anything.
Spin: the one rotation
There's exactly one rotate verb in Studio, and it's Spin, inside the Combine tool: it turns the selected member block a quarter-turn clockwise. There's no free-rotate of a whole block or an individual patch, on purpose. Rotation that matters to a layout happens later, in the quilt, where you can rotate blocks per position.
Reading the block as you draw
Studio shows you the truth about the block constantly, so you catch a problem while it's still one tap to fix:
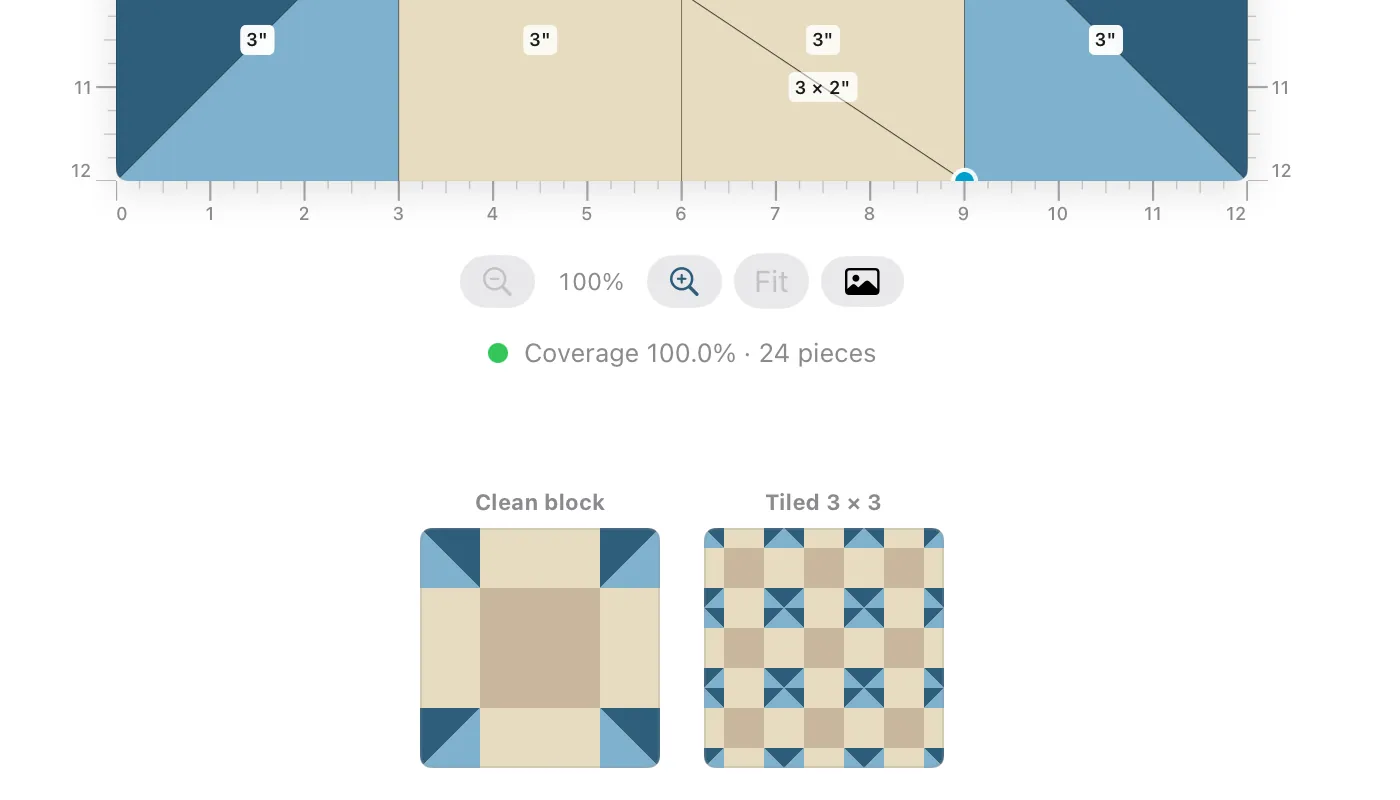
- A coverage chip under the board reads something like "Coverage 100.0% · 9 pieces" with a colored dot: it tells you whether every cell is accounted for and how many pieces the block is. If a cut leaves a sliver unaccounted for, the dot warns you.
- Two preview thumbnails sit under it, at the foot of the panel: Clean block (the block on its own) and Tiled 3 × 3 (nine of them, so you can read the repeat, where the real magic or the real mistake usually shows up).
- The View menu's overlays, Rulers, Piece sizes, Cut handles and (on a paper-pieced block) Sew order, turn on the measurements when you want them and clear them when you just want to see the design.
- Zoom controls under the board (a minus and a plus magnifier, a live readout, and Fit) get you in close to place a fiddly cut, and they stay put while the board moves under them. Pinch to zoom holding the point under your fingers; two fingers to pan, or on a Mac a two-finger trackpad drag, Option-drag, or hold Space and drag. Esc cancels a half-drawn cut, and it also drops a cut handle you've picked up and put back where it was.
If a cut or a size can't work, a red status line under the board says what's wrong rather than silently drawing something un-sewable. The one block that doesn't get the red is a paper-pieced one, because on a printed foundation an unmeasurable piece isn't a problem.
Undo, redo, and autosave
Undo and Redo step through everything you do, one action at a time: a split, a strip, a cut, a paint, a grid change. On a keyboard they're ⌘Z and ⌘⇧Z. Opening a block starts a fresh history, so the first ⌘Z after opening one undoes your first edit to it, never the opening itself (it used to, and a whole traced block could vanish under one keystroke), which is why opening a block over unsaved drawing now asks first, the way New Block does. And the canvas autosaves as you work, so closing the tab and coming back drops you right where you were. Saving to My Blocks (below) is a separate, deliberate act: it's how a block becomes a record you can use in quilts and send to people.
Generating a block
The Generate menu drafts a block from a recipe instead of by hand. There are two generators, and both save the recipe with the block, so reopening a generated block from My Blocks drops you back into its controls rather than onto a frozen drawing.
Wonky Log Cabin
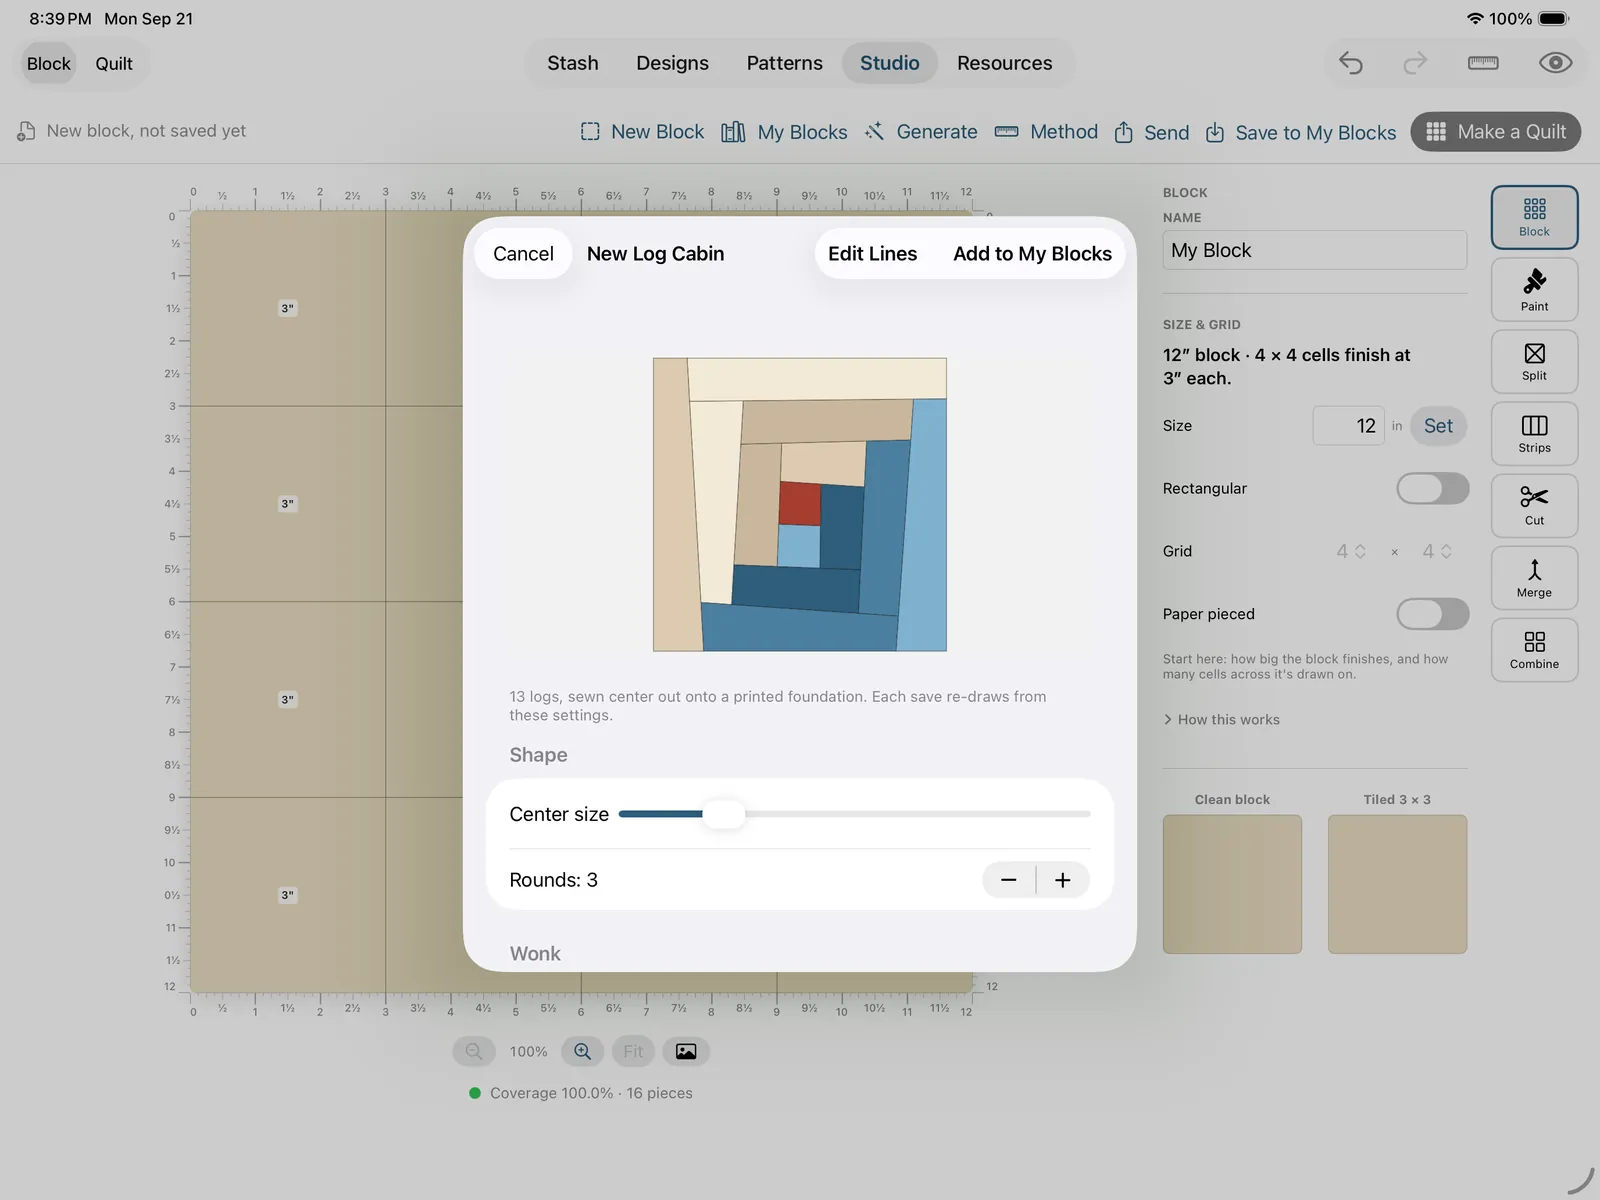
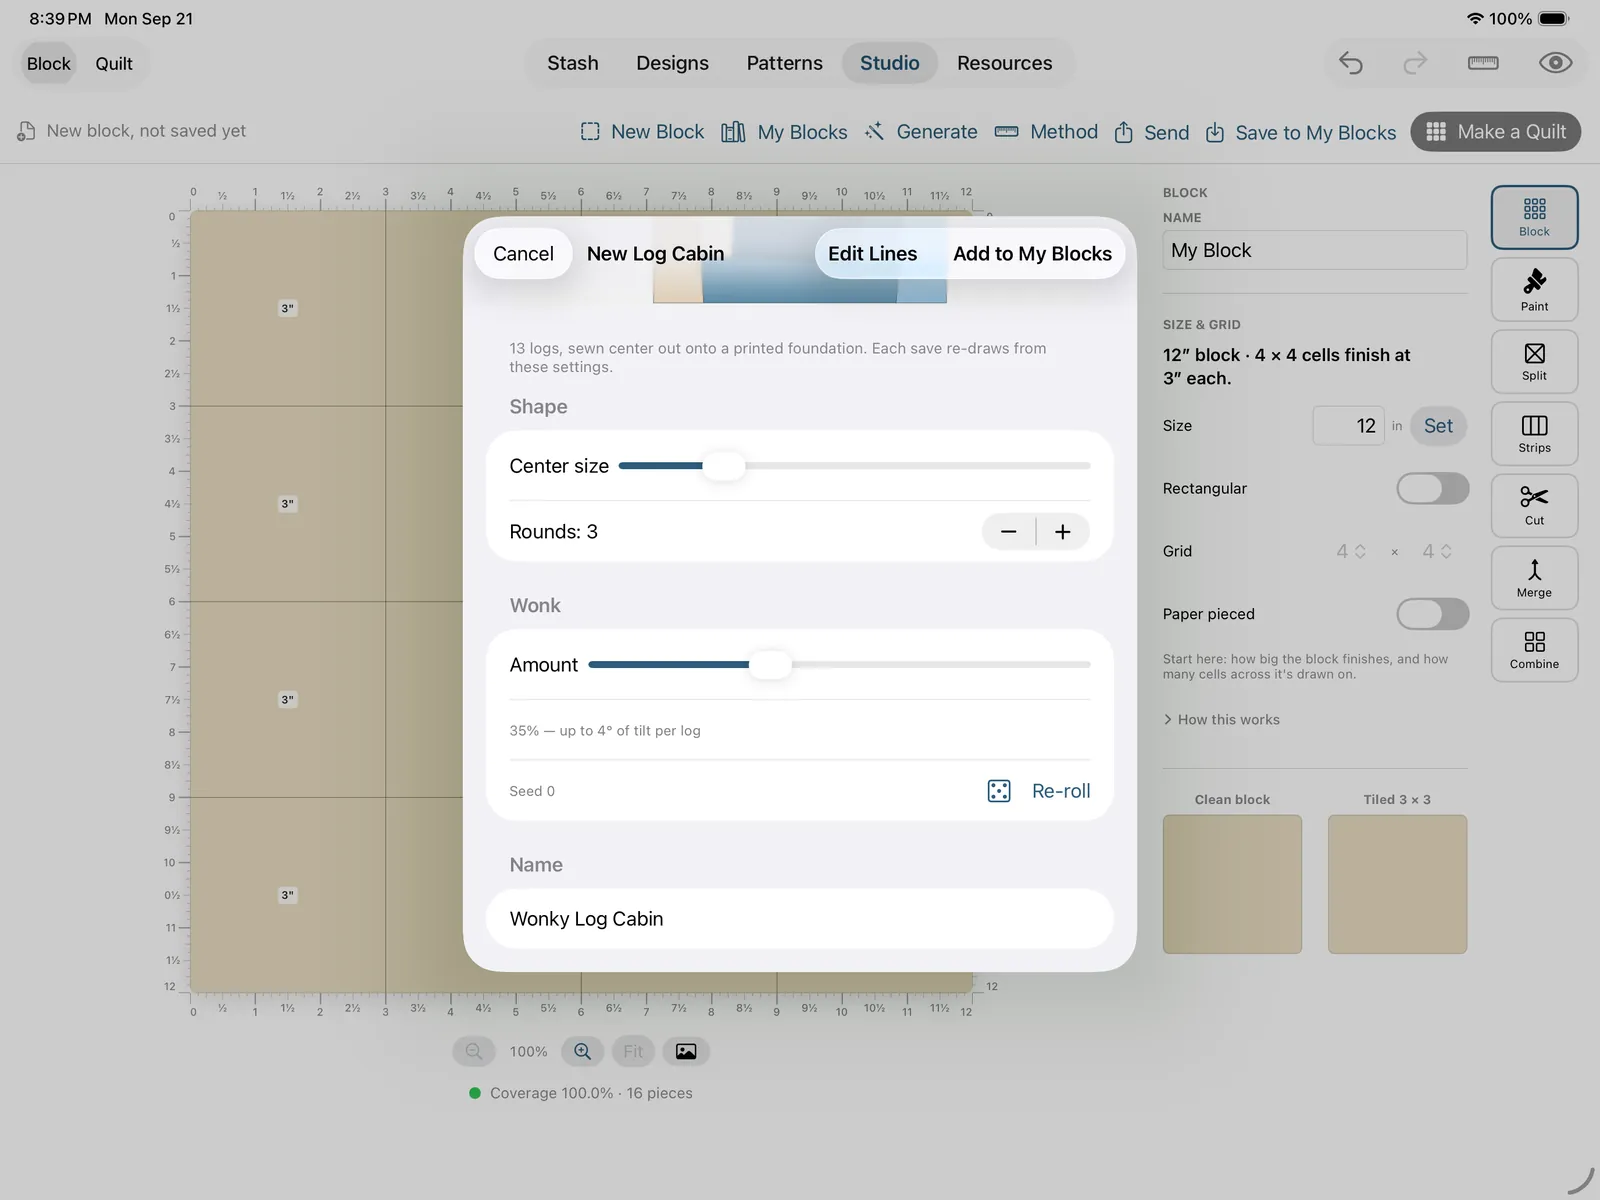
Wonky Log Cabin draws center-out logs trimmed at a slight angle for that improv look, made reproducible by a seed. It opens as its own panel with a live preview and a handful of controls:
- Center size and Rounds, the shape of the cabin.
- Wonk (Amount), how much tilt each log gets, with a live readout of the degrees of tilt.
- A Seed with a Re-roll button: same wonk amount, different random draw, until you like the one you see.
- A Name field, then Add to My Blocks.
If you want to take the machine's work by hand from there, Edit Lines puts the cabin onto the Cut canvas with every log seam a draggable line, so you can nudge any of them yourself. It edits the block in place: the first save from the canvas updates the same block rather than minting a twin, so a quilt you've already built on the cabin follows your edits. It's a one-way door, though. Once you save from the canvas the recipe is gone and the block is a hand-drawn one; back out without saving and the parametric version is exactly as it was.
Wonky Log Cabin blocks are built to be foundation paper pieced, sewn onto a printed foundation.
Stars: LeMoyne and Lone Star
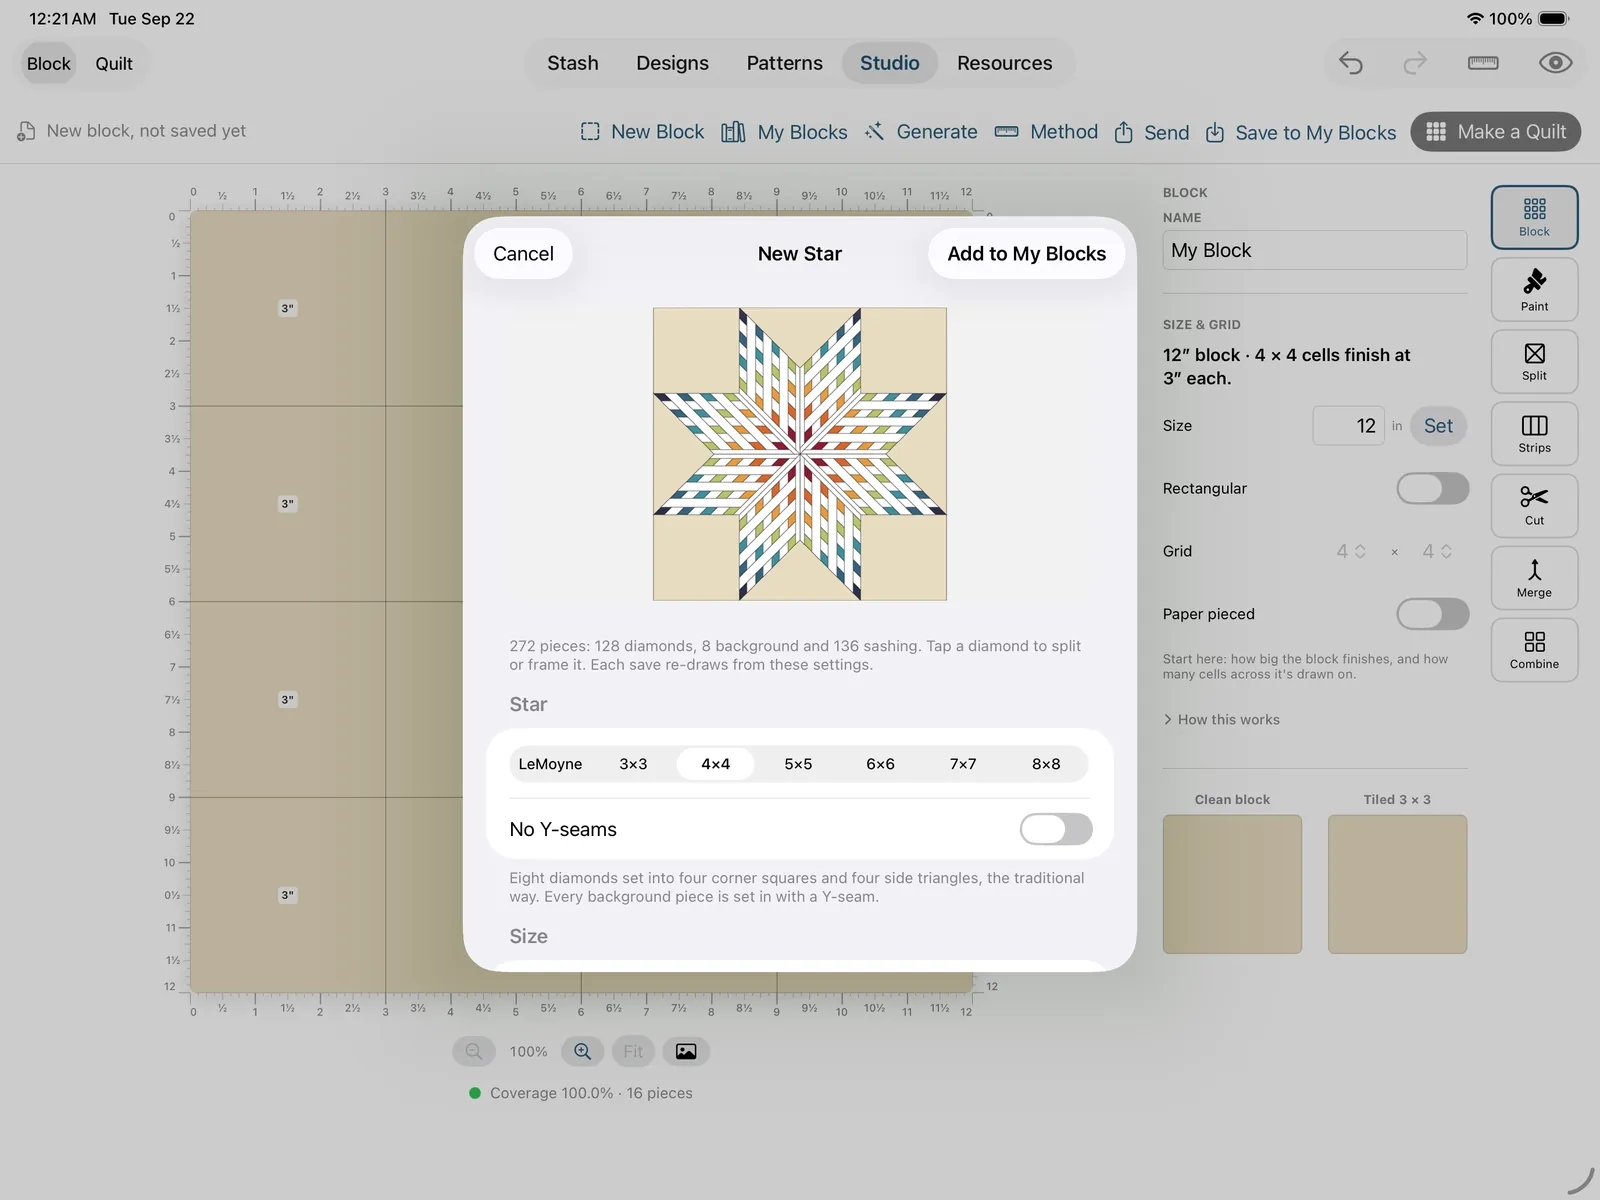
Stars draws the eight-point 45° diamond star: a LeMoyne at one diamond per point, or a Lone Star at 3×3 through 8×8 small diamonds per point, which is the whole center of a Lone Star quilt as one block. Pick Diamonds per point, then choose the background: the traditional way sets eight diamonds into four corner squares and four side triangles with Y-seams; No Y-seams splits the background so every seam is straight, at the cost of eight extra seams in the background, invisible on prints and visible on solids.
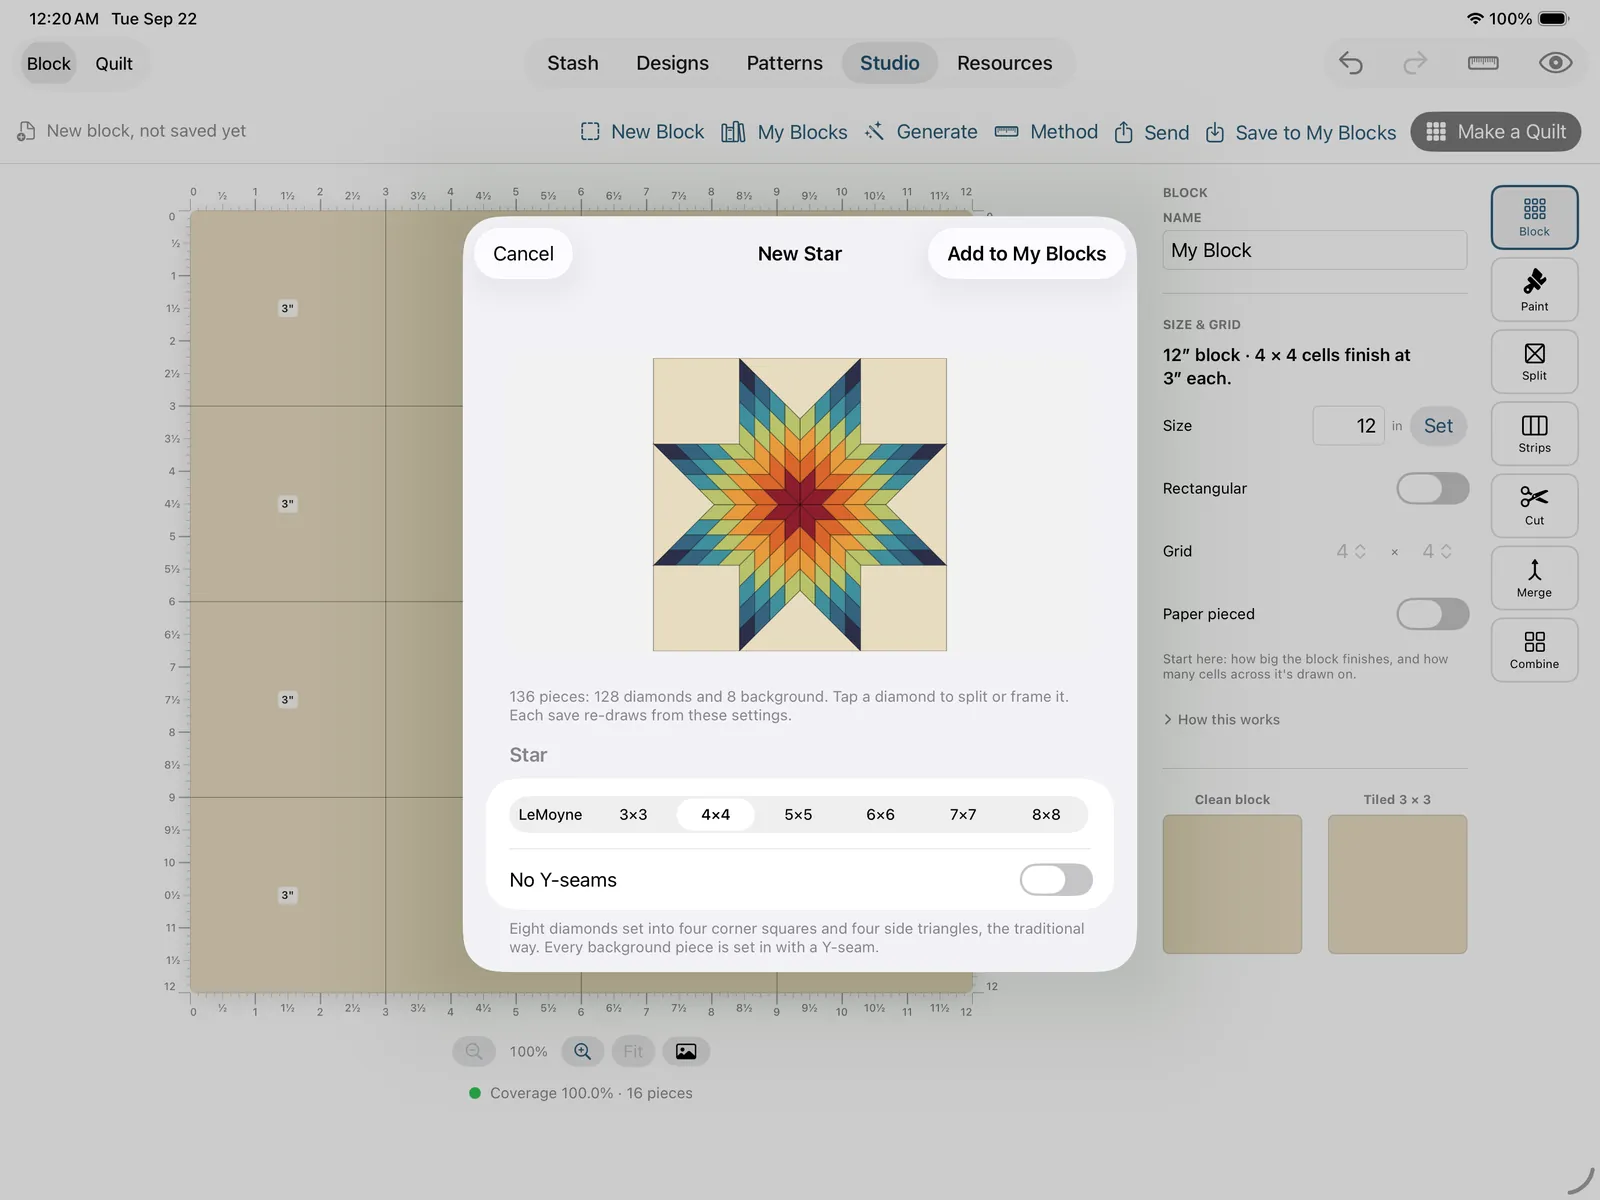
Sizing follows how each is cut. A LeMoyne takes a finished block size, like any block. A Lone Star is sized by strip width, the way patterns write it, with the finished block read back to you underneath; flip Size by to Block size if you'd rather work the other way round. Either way the footer tells you what you'll cut: cut strips … wide, then subcut with the ruler's 45° line every …, with your seam allowance from Settings doing the conversion, and it says when a size lands somewhere no ruler has a mark. The preview redraws live. Add to My Blocks saves it and stays put so you can keep tweaking; every save redraws from the settings.
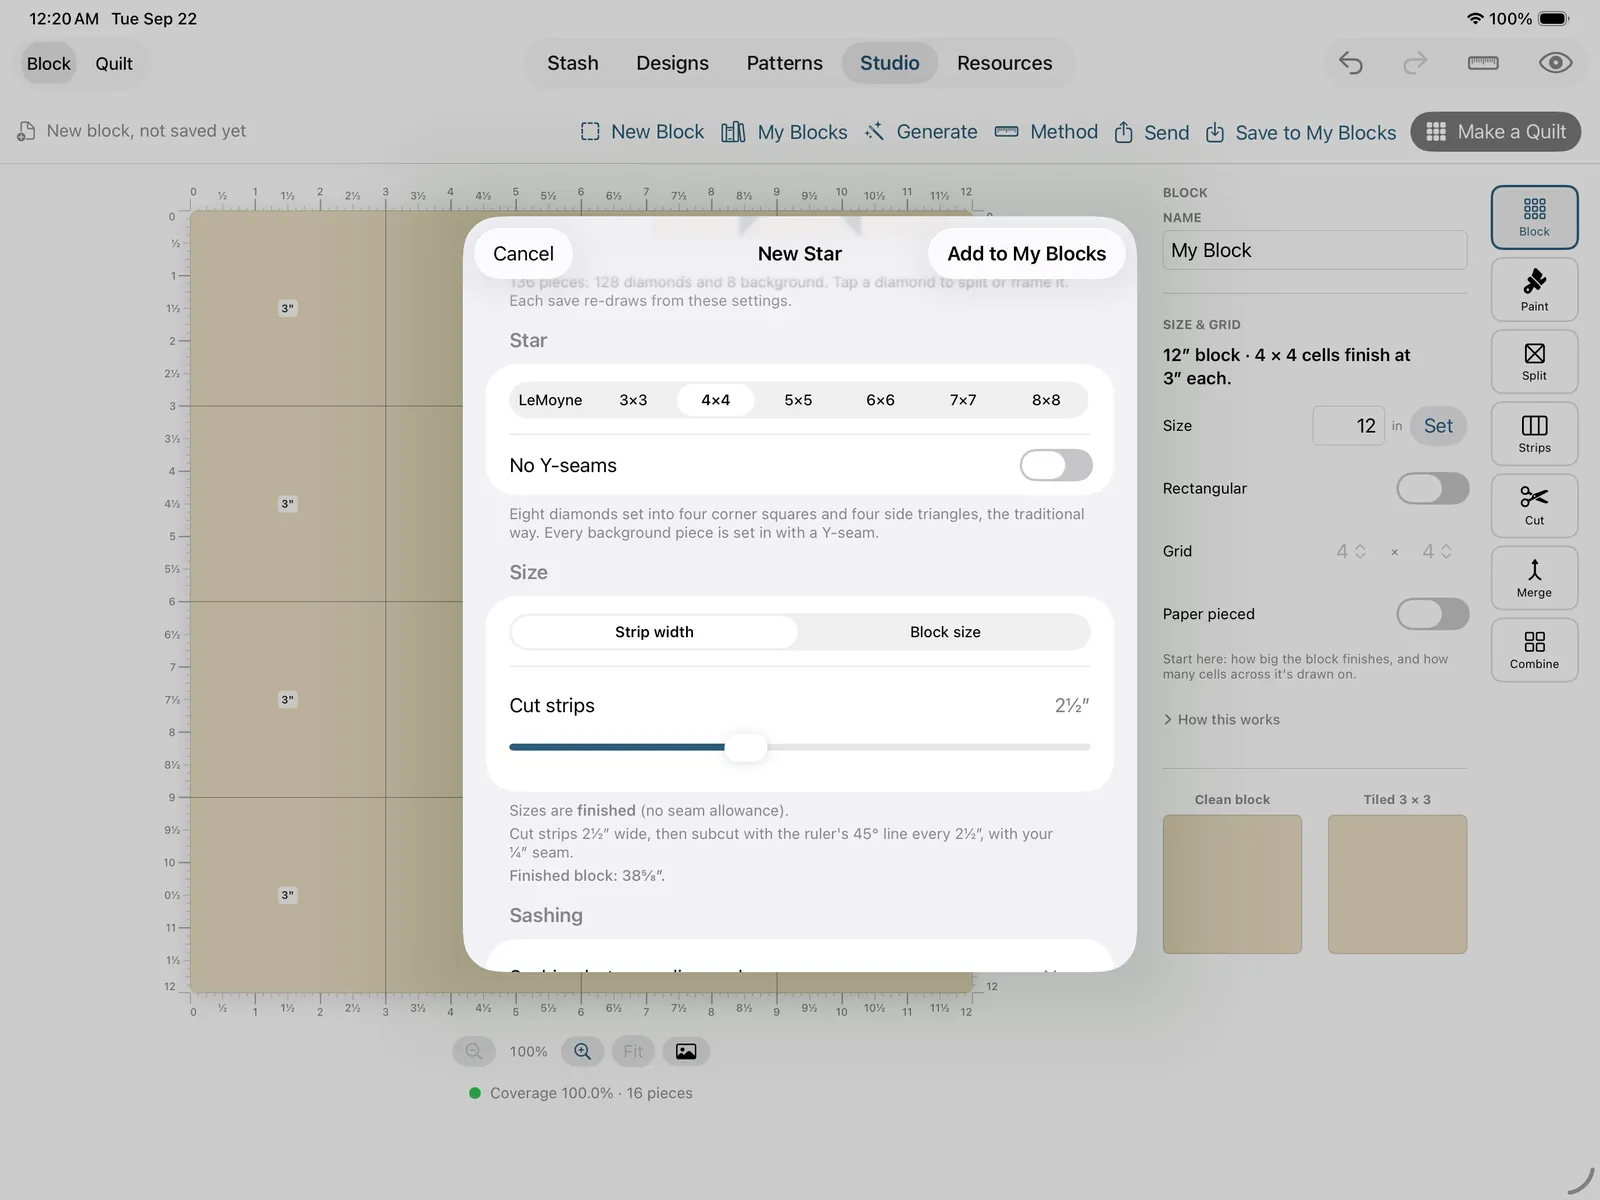
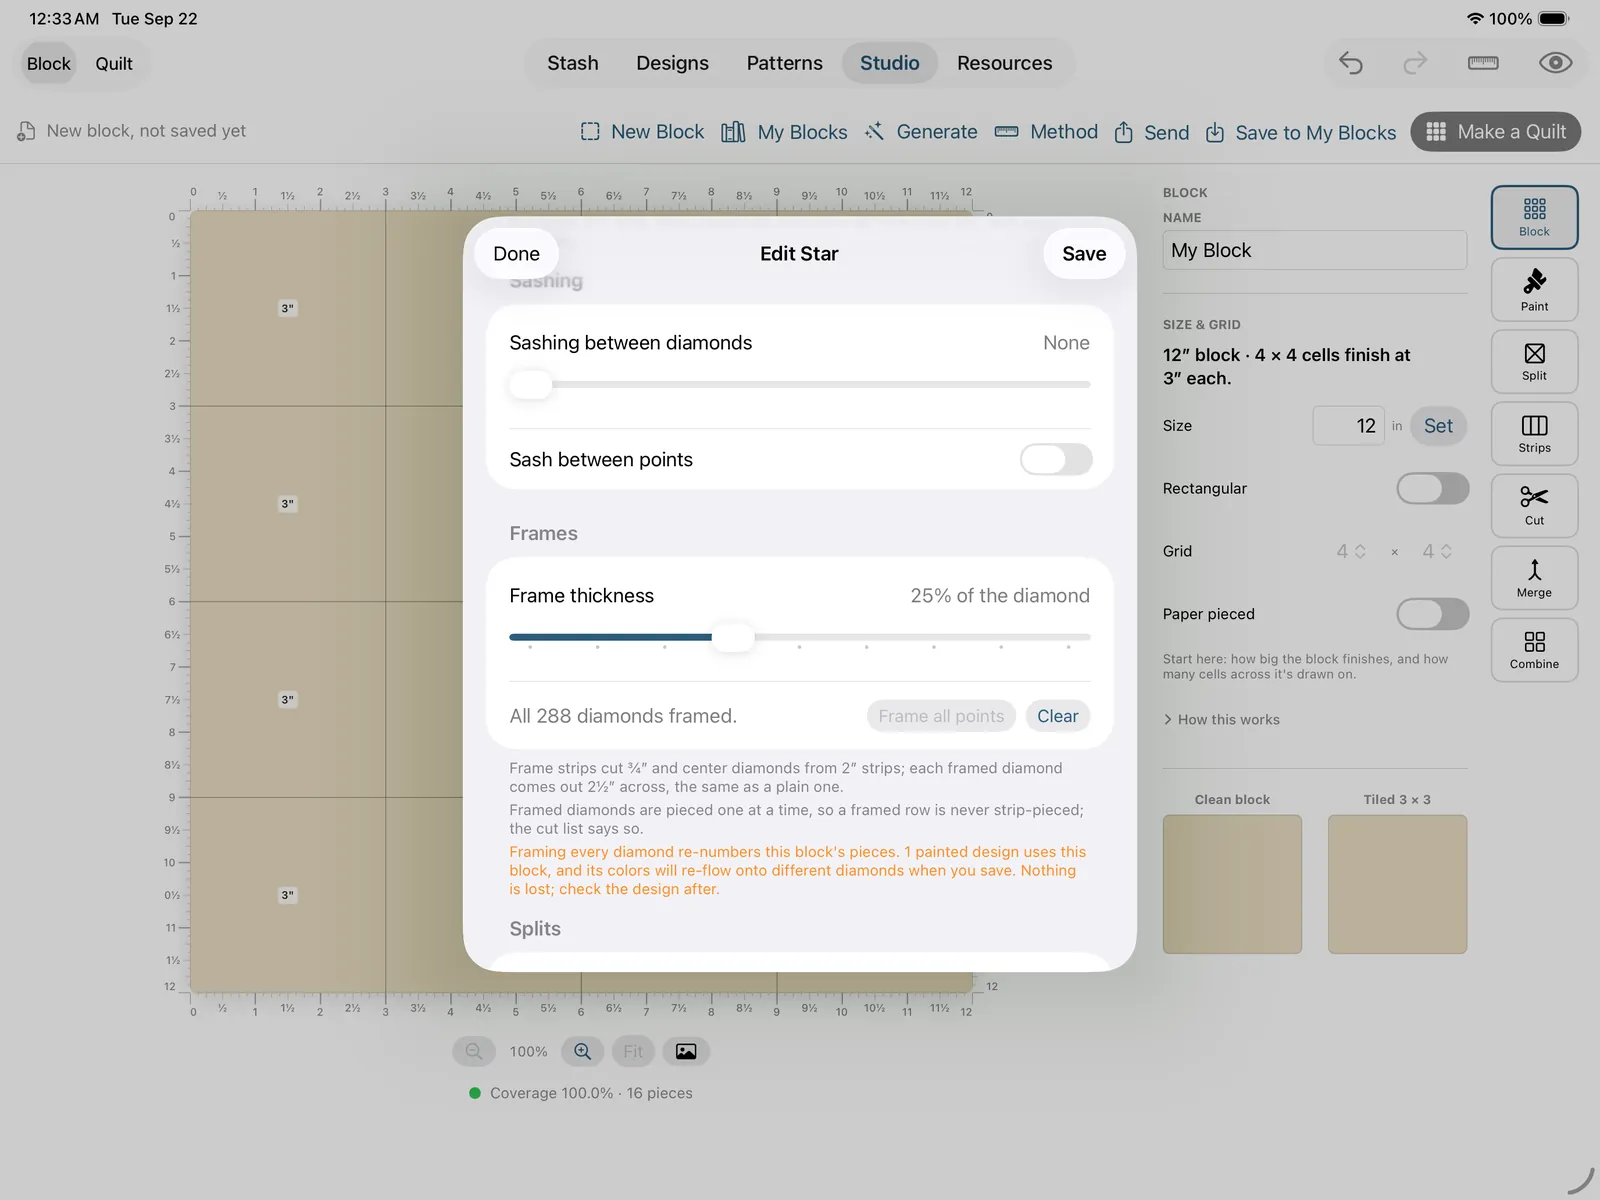
Sashing sits below the size (on a LeMoyne too, where only the between-points kind has anything to do). Drag Sashing between diamonds to put a gutter of plain fabric between every small diamond: each point stays a point, the diamonds sit apart on a lattice of narrow strips, and the background grows to meet the bigger point. The gutter is drawn in white until you paint it, and in the design editor a Ring, Point, Row or Cell tap on one gutter paints every gutter, because they're one fabric in any star you'd actually sew. Sash between points adds the same width down the eight seams where the points meet, so the sashing runs through to the center. On a small star the width caps itself so the diamonds keep at least half the point: the slider stays where you put it, and the footer says what you actually got and tells you to make the star bigger for wider sashing. The footer also tells you what the sashing costs: inside a point it goes into the strip sets (a 4×4 star's set is seven strips rather than four, fabric and sashing alternating, the sashing strip cut to your gutter plus two seam allowances and never rounded), between rows it's a long strip sewn in when the rows are joined, and between points it's two half-width bands, one on each inner edge of every point, so the star still goes together with its usual eight seams. Set the slider to None and the star is exactly the unsashed one. The user guide has the full cutting story.
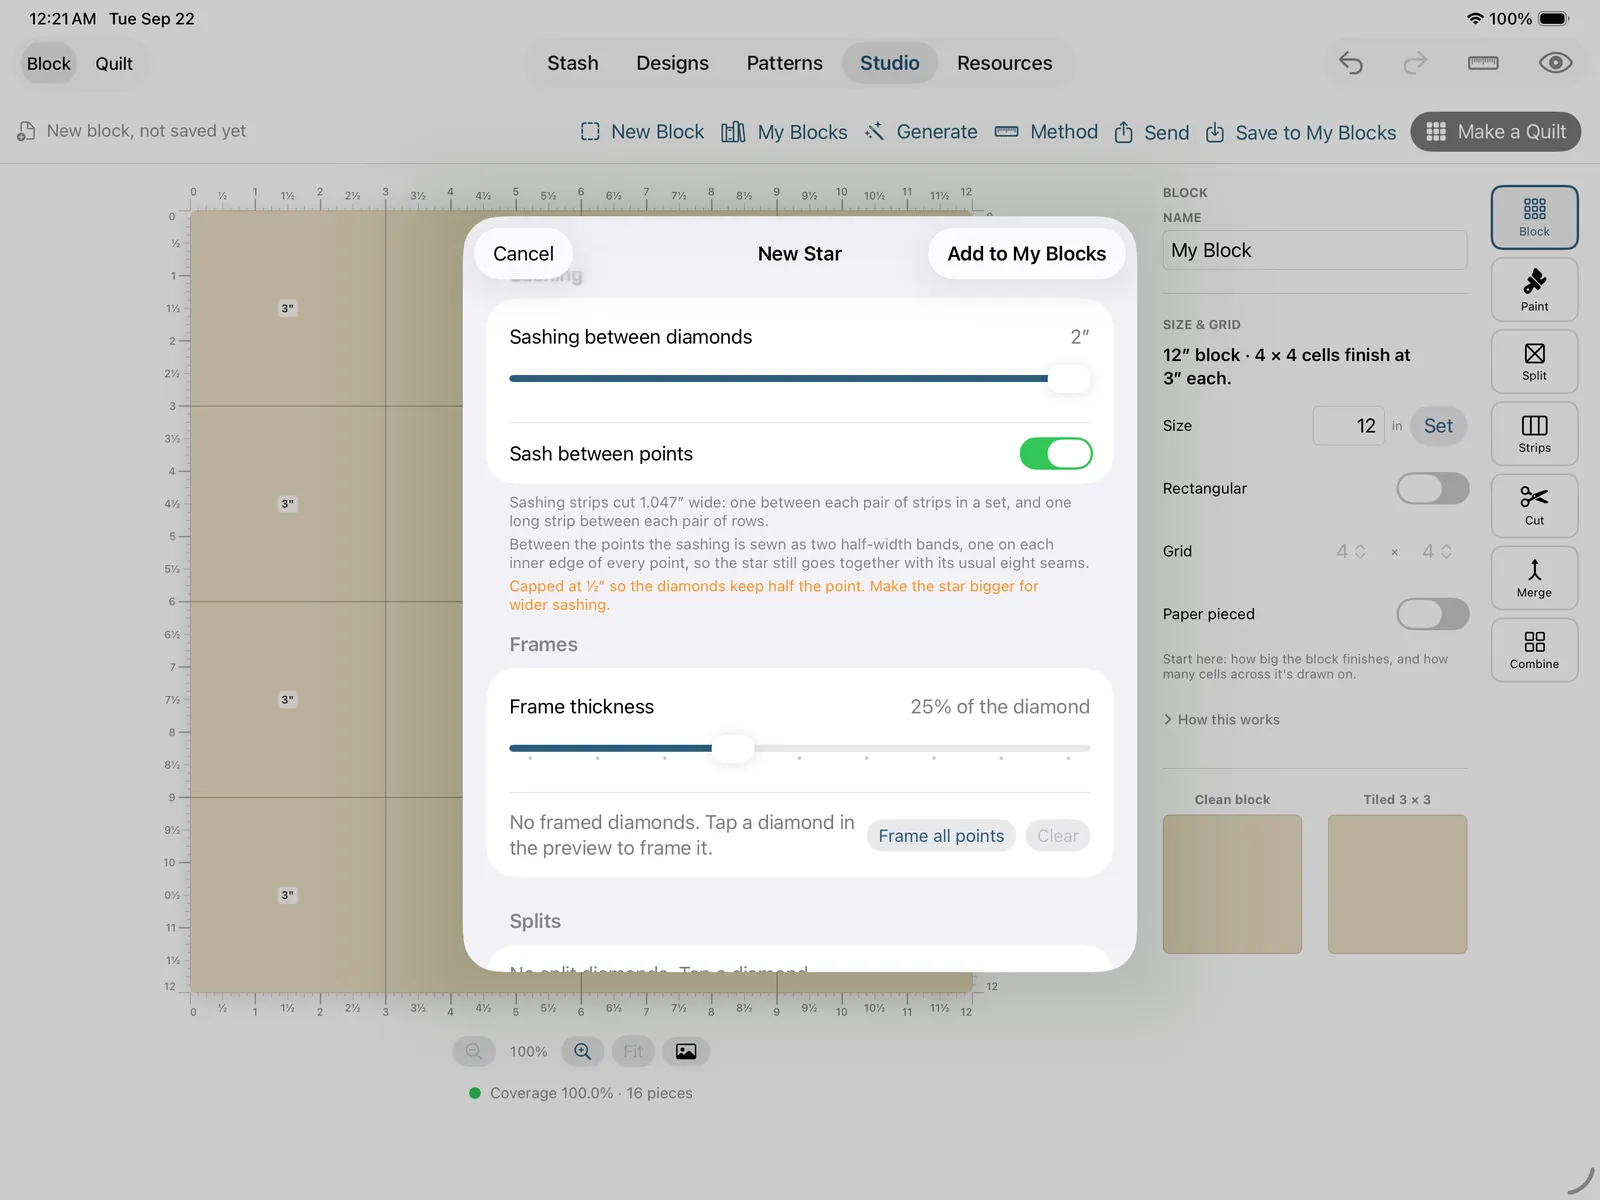
Frames and splits change what a diamond is. Tap any diamond in the preview to cycle it: whole, split on the short diagonal, split on the long diagonal, framed, and back to whole. A split diamond is two triangles, painted separately in the design editor, which is how a radiating-line star gets its second color; Split all on the long diagonal does the whole star at once. Frame all points gives the snowflake look, with the Frame thickness set as a share of the diamond. A framed diamond is sewn as a small center diamond with four frame strips round it, every piece cut from a strip on the ruler, and the cut list bills it that way, with the center strip figured so the framed diamond comes out exactly the size of a plain one. A split diamond's halves have no ruler cut (a long-diagonal half is a 135°/22.5°/22.5° triangle, a short-diagonal half 45°/67.5°/67.5°), so the cut list bills each as a template, cut from a rectangle and trimmed to the shape in the block diagram, and the two halves are joined before the point is pieced. Neither a framed nor a split row can be strip-pieced, and the pattern says so.
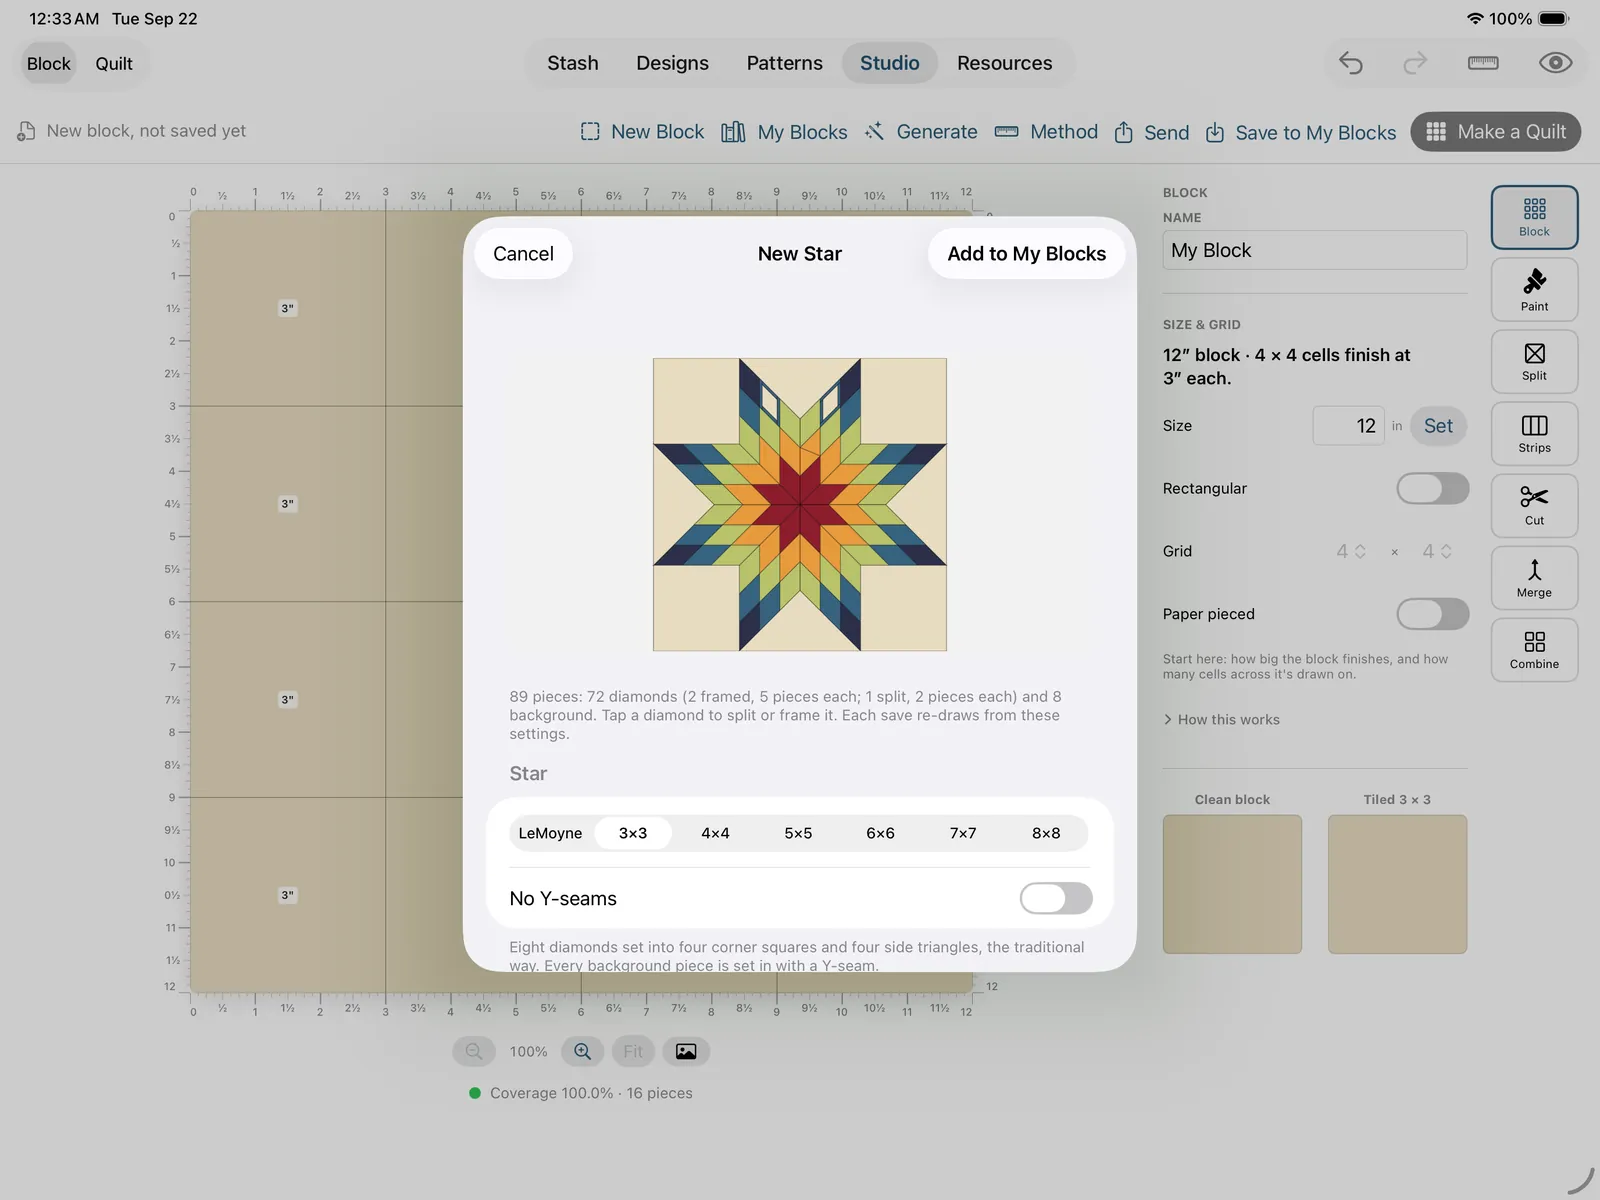
Merging a run of diamonds into one piece is done on the quilt, not here, because it's a fabric decision: once the star is in a design, load the editor's Merge tool, tap two or more whole diamonds side by side in one row of one point, all painted the same fabric, and tap Merge. The seam between them vanishes and the cut list bills the run as one long parallelogram off the very same strip as the diamonds, subcut at 45° at the run's length. A column, an L, two rows, a framed or split diamond, or two fabrics in one run is refused with a line saying why, and Unmerge puts the diamonds back. A merge renumbers nothing.
Frame all and Split all do renumber. Every diamond has an index the design editor paints by, and framing or splitting the whole star at once changes those indexes, so if the block is already in painted quilts the section footer turns orange and warns you before you save: those quilts' colors will re-flow onto different diamonds. Nothing is lost, and the warning never blocks the save, but open the design afterward and check. Tapping one diamond at a time re-indexes too; it just doesn't warn, because the bulk buttons are where a quilter re-numbers 128 cells without a second thought. The same check-the-design rule applies.
Unlike the log cabin these are ordinary pieced blocks, cut with a rotary cutter and sewn at the machine, so there's no foundation to print. What they carry instead is everything the app knows about stars: in the design editor a star block gets the One tap paints · Ring · Point · Row · Single control, so one tap lays a fabric round a whole ring instead of a hundred and twenty-eight diamonds; and its pattern is the sequence a star is actually sewn in, with a drawing per step, the ¼″ dots and stop bars marked, and a Lone Star's points billed as strip sets read off the fabrics you painted. The same star is available on every device from New design → Stars; Studio is where you get the live preview and can reopen and re-cut one.
Tracing from a photo
The photo button in the zoom row drops a photo behind the canvas so you can trace a block you're looking at. Tap it for a popover: with nothing loaded it offers Add from Photos… and Add from File… (a screenshot or scan saved to Files comes in upright); once a photo is in, it carries an Opacity slider, a Size slider, Replace Photo… and a red Remove Photo, and the button fills in and tints so you can see a photo is loaded. Size scales the photo about the board's center from 0.5× to 4×; 1× is the fit, the photo fitted to the board's real shape, so a rectangular block gets a photo fitted to a rectangle, not stretched into a square. It's the same control the design editor's reference photo has, in the same place. The reference is a guide only; it never becomes part of the block or its cut list.
The photo stays with the block, size and opacity included: save it, come back later, and the reference is right where you left it, so a trace you didn't finish in one sitting is waiting for you. It's yours alone, though, a block you send goes without it, so your source photo never travels to someone else.
Foundation paper piecing
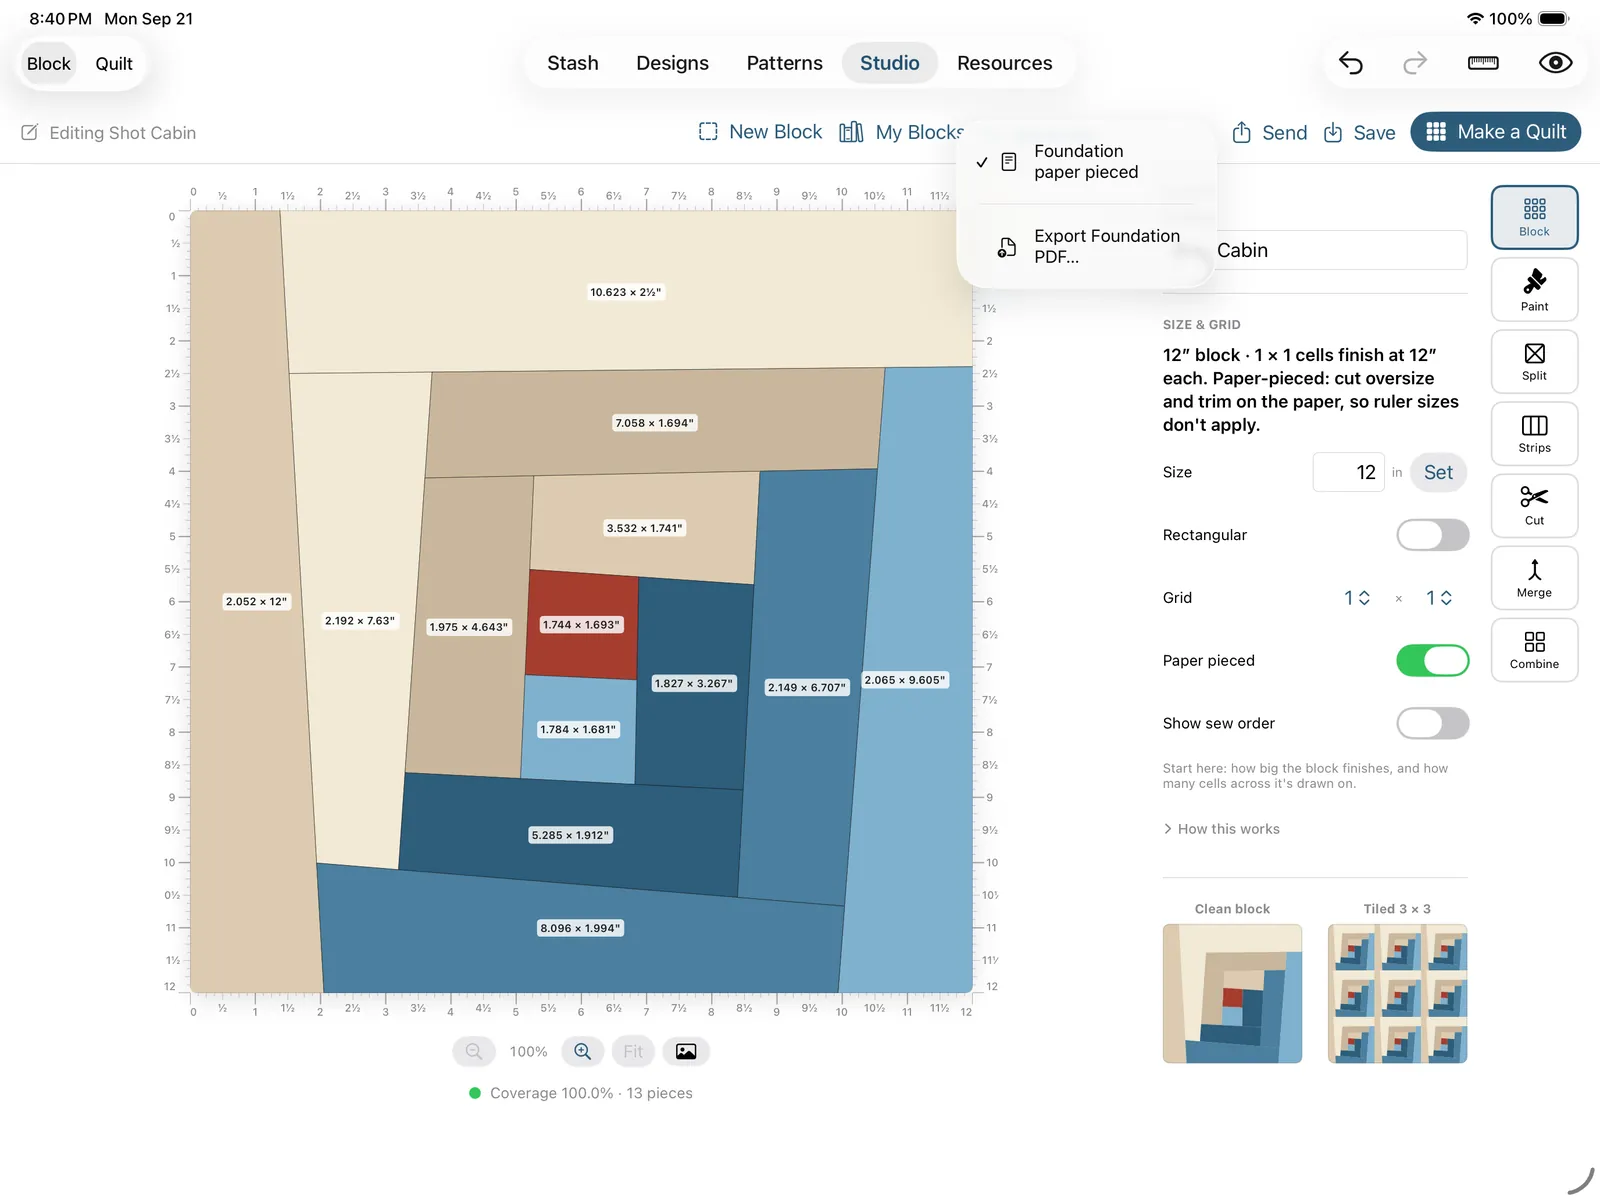
Some blocks are pieced not by cutting shapes and joining them, but by sewing fabric onto a printed paper foundation: you cut each piece a little big, sew them on in numbered order, and trim as you go. The Wonky Log Cabin is one (its logs finish at angles no ruler has a mark for), and any block you draw can be. Two controls set it, and they're the same setting: the Method menu in the host bar (a Foundation paper pieced check; unchecked is plain pieced), and the Paper pieced switch in the Block panel, which sits next to the size warnings because those are what send you looking for it. On a paper-pieced block an unmeasurable piece isn't a fault, the paper takes care of it, so the red goes away.
Two things come with the method:
- Export Foundation PDF… appears under Method once the block is paper-pieced, and on the block's menu in My Blocks. It saves first, so what prints is what's on the canvas, then prints the foundation: the pieces mirror-reversed, as you'll sew them from the back, each with its sew number, a dashed trim ring outside every seam line, and a 1″ square on the first page (of each section) to check your printer's scale against before you cut anything. The trim line is drawn at your seam allowance from Resources → Settings → Seam allowance, not a fixed ¼″, so the paper matches the machine you sew on. That prints the block on its own, at the size it was drafted. For a quilt, print from the pattern instead: a paper-pieced quilt's Pattern → Sew section has its own Export foundation PDF button, which sizes the paper to the quilt's blocks. Draft a cabin at 12″, set the quilt to 6″ blocks in Layout, and that button prints 6″ paper whose trim ring matches the 6½″ blocks the Cut list is sized for. Don't scale a printout to change its size: the seam allowance ring shrinks with it.
- Sew order on the canvas. Switch it on from the View menu, or with the Show sew order switch beside Paper pieced, and every piece wears its number in a small white disc, on the finished side (the paper is mirrored because you sew on the back of it; the block on screen is the way round you're looking at it). The numbers are the printed foundation's own, resolved the same way, because a screen that disagrees with the paper in your hands is worse than a blank one. Prop the iPad beside the machine and it's the piecing guide as well as the color guide.
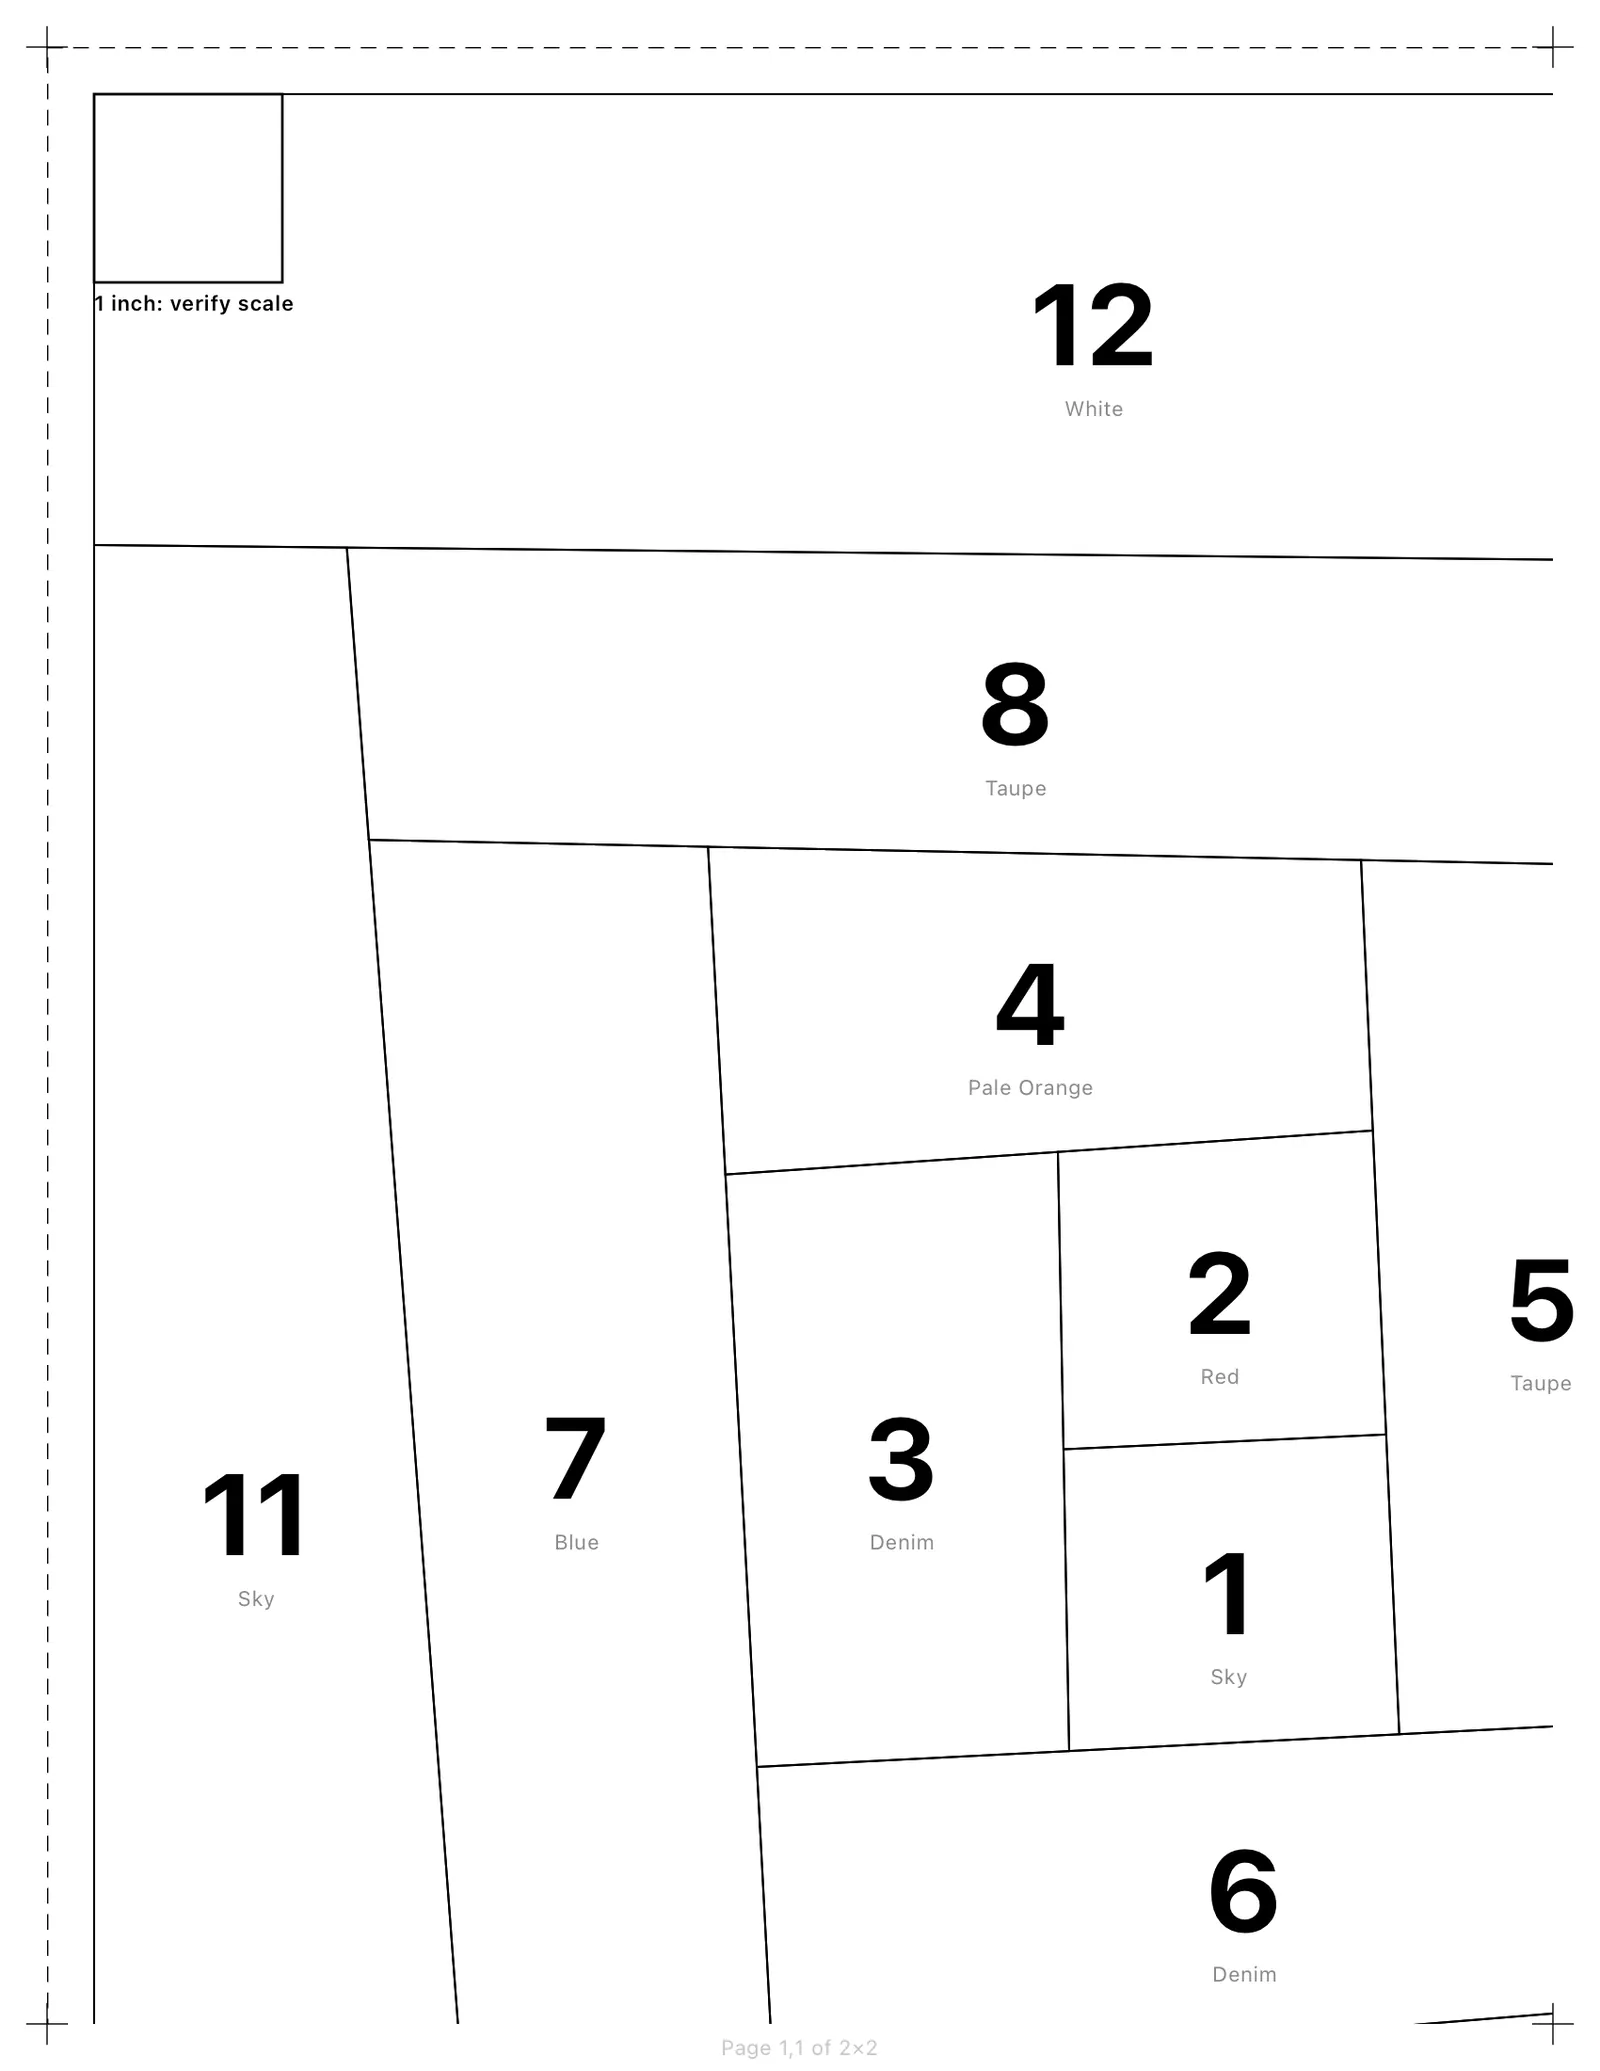
Blocks that need more than one foundation. Most paper-pieced blocks can't be sewn on a single sheet: a fan of wedges, a New York Beauty, anything where a seam has to be crossed by another. Studio works those out the way a quilter does, by finding a seam that runs clean across the block, splitting there, and looking at each side again until every part sews on one foundation. The sections are lettered A, B, C in the order you sew them, and the numbers restart inside each one, so a piece reads A1, A2, B1. On the canvas, Sew order writes those letters on the pieces and draws each join seam as a heavy dashed line with a numbered badge: sew section A, sew section B, then join them along seam 1. The export prints one foundation per section, each with its letter on every number and its own dashed trim ring (the ring runs along the join seam too, because that's the allowance you sew the sections together through), and ends with an assembly page: the finished block with the sections lettered and the join seams numbered, and the steps written out with each seam's length.
The one block Studio still refuses is one no straight seam can split, like four rectangles spun around a center square, which needs a partial seam. The overlay and the export both say so, and say why, rather than handing you a foundation that won't go together; extend one of those cuts edge to edge and it sections.
Foundation export is part of Studio: it's one of the things the unlock buys, from inside the designer and from your saved-blocks library.
Saving, naming, and editing (My Blocks)
Type a Name for the block, then Save to My Blocks. Once a block is a saved record the button reads Save (not "Save to My Blocks"), and re-saving updates that block instead of piling up copies. The status line tells you which state you're in: drawing something new, or editing a saved block by name.
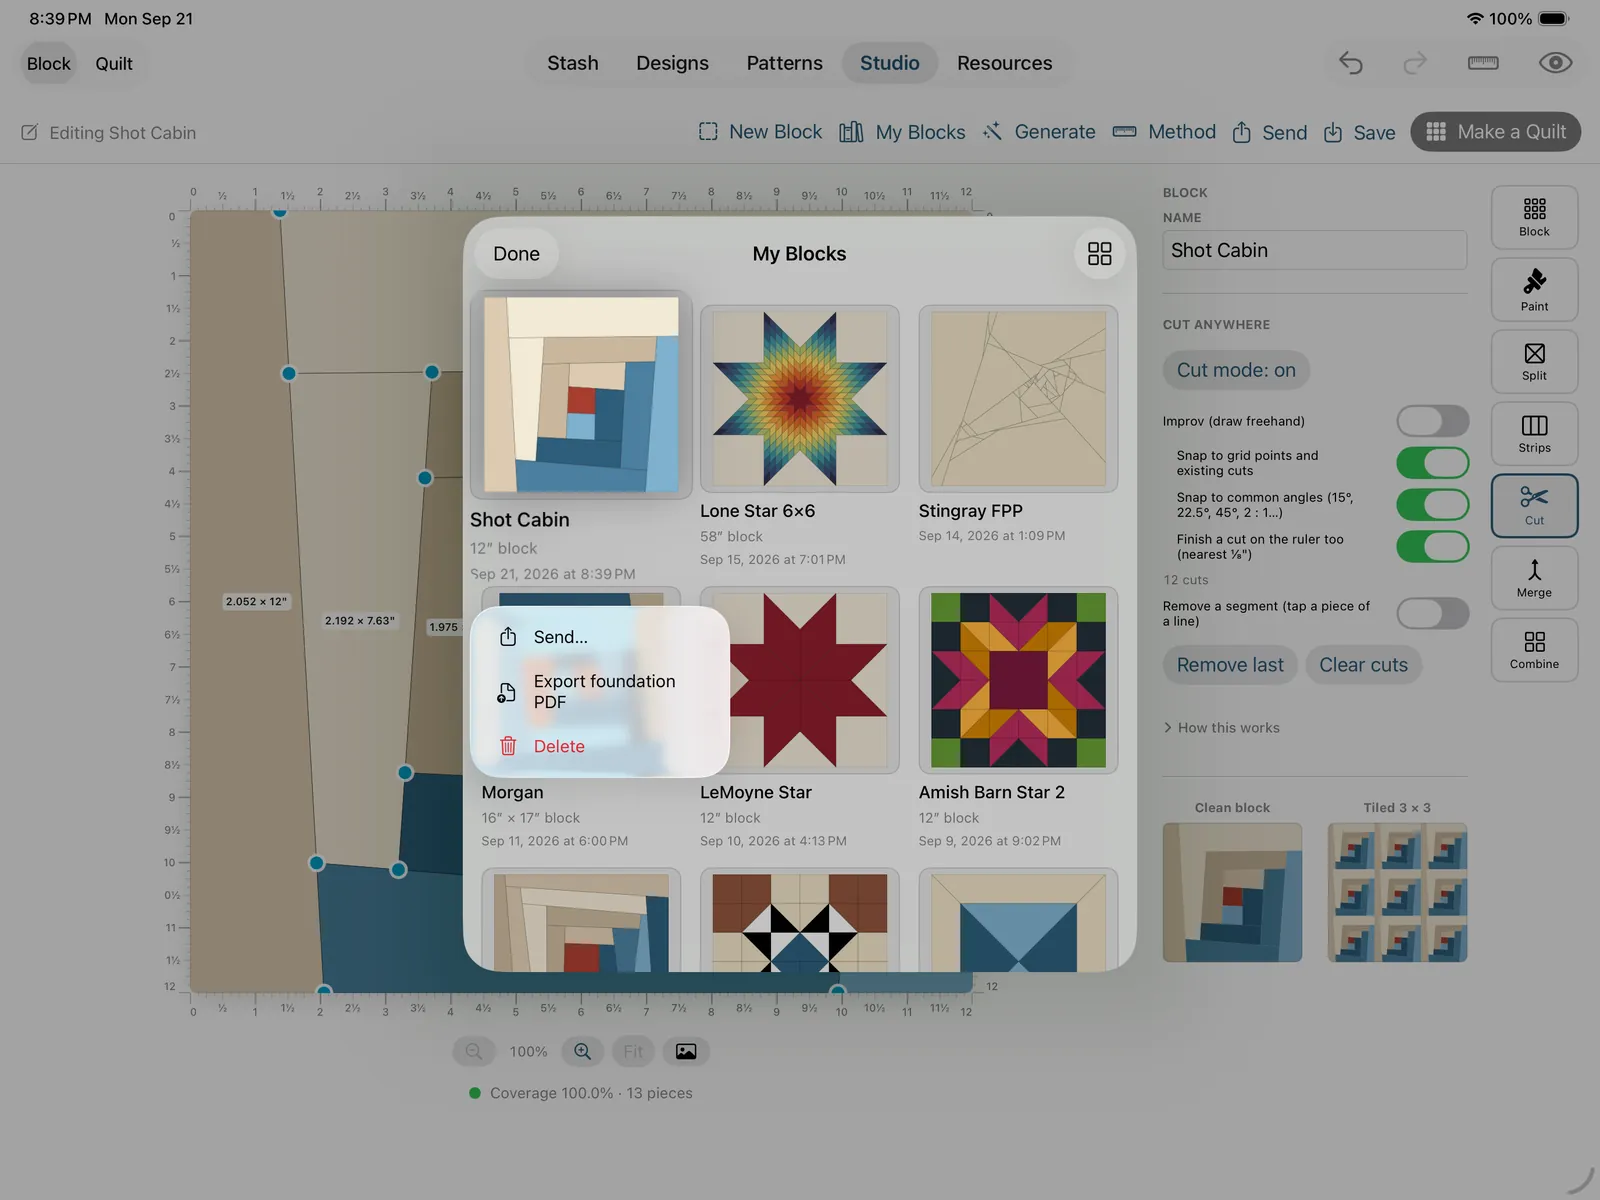
My Blocks opens your library as a gallery of the blocks themselves, newest edits first, each drawn from its own geometry the way the block picker draws it. (It used to be a list of names and dates, and with five blocks all called some flavour of "Wonky Log Cabin" that told you nothing.) A menu at the top switches to the list when the dates and where a block came from are what you're after. Tap a block to reopen it and keep working (a generated block reopens into its generator panel; a hand-drawn one onto the canvas, and if the board has unsaved drawing on it, it asks before replacing it). Press and hold one (Control-click on Mac) for Send, Export Foundation PDF… on a paper-pieced block, and Delete. Deleting a block you've already used in a design doesn't change those quilts; they simply show it as missing, and it comes right back if you save it again.
Renaming is just editing the Name field and saving again; there's no separate rename step to learn.
If a save ever fails, it's almost always because the block has no name or no pieces yet. Give it a name, draw at least one piece, and try again.
Sending a block to someone
Send hands the block on your canvas to another quilter over Messages, Mail, or AirDrop (a save panel on Mac). It saves first, so what travels is what's on screen, not the last version you remembered to save.
When you send a block you drew, Studio asks one question: is it just for them, or theirs to pass along? Either way they can use it in as many quilts as they like; the choice is only about whether they can forward it. That's a courtesy the app keeps on your behalf, and it cuts both ways: a teacher can hand one file to a whole class and mark it pass-along so it travels.
A block that was sent to you carries its author's answer already, so Send skips the question, and it's disabled entirely if the author didn't allow passing it on.
On the receiving end, a block file works like any other: tap it in Messages, Mail, or AirDrop and TideStitch takes it in, or add it from Files via Settings → Add a Block You Were Sent… (see the main User Guide). Sent blocks land on their own Sent to you shelf in the picker, kept separate from the ones you drew, so the app never tells you that you made something you didn't.
Make a Quilt
Make a Quilt is the shortcut from a finished block to a real design. It reads the rows, columns, sashing, and cornerstones you set in Quilt mode, saves the block, lays it up into a top, paints it the way you drew it, and drops you straight into the design editor looking at the finished quilt.
From there it's an ordinary design: recolor it with real fabric, add borders, make colorways, and make a pattern with cut list and sew order.
One thing to keep in mind: this step creates a design, and a design counts against the free-design limit exactly as starting any new quilt does. Owning Studio buys you the designer, not unlimited quilts. The block itself never counts; drawing blocks is unlimited. It's turning one into a quilt that spends a slot, same as everywhere else.
Using your blocks everywhere else
The whole point of Studio is that its blocks aren't trapped in Studio. Once a block is saved to My Blocks:
- It appears in the block picker when you start a new block design, on its own shelf alongside the built-ins.
- It syncs to every device on your Apple ID, iPhone included. You can't draw on the phone, but you can build quilts with blocks you drew on the iPad.
- It rides along in your library backup (the
.tidestitchexport), so it's safe and portable. - It can be sent to another quilter, who uses it exactly as you do.
A Studio block is a normal block from the app's point of view. Everything the app does with a built-in block, it does with yours.
Device notes and troubleshooting
- "Needs a bigger window." You're in a window too narrow for the designer: an iPad sharing the screen, or a Mac window pulled in tight. Open TideStitch full screen on the iPad, or widen the window. (A phone never shows this; it has no Studio tab at all.)
- The Studio tab isn't there. You're on a phone: Studio only shows its tab where it can actually run, and Resources carries an About Studio card there instead. On an iPad or a Mac the tab is always in the bar.
- The Studio tab says it's locked, and I paid. Restore purchases on that screen, or Resources → Settings → Purchases → Restore Purchases, and check you're signed into the Apple ID you bought on.
- A design shows a block as missing. That block is in your library but hasn't reached this device yet, or was deleted on another one. Give sync a few minutes, or re-save the block. The app draws nothing and says so, rather than substituting a block you didn't choose.
- My blocks aren't on my other iPad. Studio blocks sync over iCloud with the rest of your library. A new device takes a few minutes to catch up; make sure both are signed into the same iCloud account. A backup export/import moves them immediately if you'd rather not wait.
Quick reference
The tools (Block mode):
| Tool | What it does |
|---|---|
| Block | Set the finished size and the grid (columns × rows) |
| Paint | Color pieces (design look, not real fabric yet) |
| Split | Divide a cell diagonally or in half |
| Strips | Slice cells into strips that cut as single pieces |
| Cut | Draw a straight cut anywhere, at any angle |
| Merge | Join small pieces into one patch |
| Combine | Build the block out of other saved blocks |
Top bar: Block / Quilt mode · Undo (⌘Z) · Redo (⌘⇧Z) · Size & grid · View overlays (Rulers, Piece sizes, Cut handles, Sew order on a paper-pieced block).
Generate: Wonky Log Cabin (paper pieced, Edit Lines to take it by hand) · Stars (LeMoyne, or a 3×3 to 8×8 Lone Star, with or without Y-seams).
Paper piecing: Method → Foundation paper pieced (or the Paper pieced switch in the Block panel) · Export Foundation PDF… · View → Sew order.
Host bar: New Block · My Blocks · Generate · Method · Send · Save · Make a Quilt. The reference photo is the photo button in the zoom row.
Gestures: tap is the primary action for every tool · pinch to zoom · two fingers to pan (two-finger trackpad drag, Option-drag or Space-drag on Mac) · drag a cut's endpoint or middle to move it · Shift-tap in Strips to build a run before cutting · Esc cancels a half-drawn cut or a picked-up handle (Mac).
Runs on: iPad (full screen) and Mac. Not iPhone, not Slide Over. Blocks sync everywhere, phone included.
Questions or something not working? Resources → Contact Support opens a pre-filled email. Studio is new and growing, and feedback genuinely shapes what gets built next.